Thursday, October 15, 2009

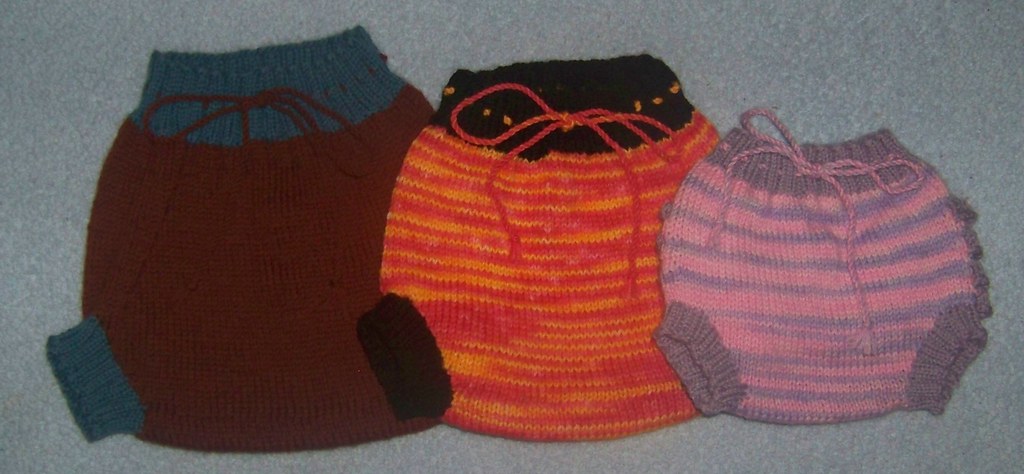
Li'l Aries Soaker


Li'l Aries Soakers
Originally uploaded by tangledskeins
Materials:

Yarn: Worsted Weight Wool
Recommended needles: US 6 straight (for cast on), US 5 circular or DPN’s (for waist and leg cuffs), US 7 circular or DPN’s (for body and girly options), US 8 (for skirty bind-offs)
Stitch markers, at least 3
Stitch holder
Tapestry needle

**Read all instructions carefully first. There are special instructions for girly options.**


Suggested gauge: 5 ½ stitches per inch and 6 rows per inch in stockinet on US 7

General measurements (unstretched to slightly stretched)
NEWBORN= WEIGHT up to 11lbs WAIST 11-15 in. RISE 14-15in. THIGHS 6-11 in.
SMALL= WEIGHT 11-17 lbs WAIST 12-18 in. RISE 15-16 in. THIGHS 7-12 in.
MEDIUM= WEIGHT 15-20 lbs WAIST 12.5-20 in. RISE 16-17 in. THIGHS 8-13 in.
LARGE= WEIGHT 20-24 lbs WAIST 13-22 in. RISE 17-18 in. THIGHS 9-14 in.
X-LARGE= WEIGHT 25lbs+ WAIST 14-24 in. RISE 18-19 in THIGHS 10-15 in


Instructions are for Newborn(Small, Medium, Large, Extra Large)


Waist band:

Cast on 64(80, 96, 112, 128) stitches on US 6 needle (maintains stretch). Transfer stitches to US 5 circular or DPN’s, place stitch marker and join in a loop.

1. K2P2 Rib for 8(10, 12, 14, 16) rounds


Body:

Switch to US 7 circular or DPN’s
1. K4(5, 6, 7, 8), M1 (Insert left needle from the front and pick up the bar between the stitches, knit into the back.), around. (80, 96, 112, 128, 144 stitches)

2. K 2(3, 4, 5, 6) rounds.

3. K 20(24, 28, 32, 36) stitches, place hip marker, K 40(48, 56, 64, 72) stitches, place hip marker, K remaining 20(24, 28, 32, 36) stitches.


4. Work Wrapped Short Row Set:
Work around to the turning point (second hip marker placed), turn, yo purl-wise….bring yarn behind needle and insert needle into first stitch purl-wise…Purl across to the turning point (first hip marker placed), turn, yo knit wise…bring yarn in front of needle and insert needle into first stitch knit-wise, Knit across to the last stitch before the marker, slip that stitch purl-wise, remove marker, replace stitch on left needle, place marker on right needle. K2tog (yo and 1st stitch after the ‘gap’) Continue knitting around past the joining marker, to the stitch before the next hip marker. Slip that stitch knit-wise, remove the marker, slip the next stitch knit-wise, knit those 2 stitches together (as in SSK), place marker on right needle. Continue knitting around to the joining marker.

5. K 2(3, 4, 5, 6) rounds.

6. Repeat 4-5 3 more times.

7. K 15(19, 23, 27, 31) stitches. Bind off the next 5 stitches. K 39(47, 55, 63, 71) stitches {40, 48, 56, 64, 72 stitches including last live loop from bind-off}. Bind off next 5 stitches. K remaining 14(18, 22, 26, 30) stitches {15, 19, 23, 27 31 stitches including last live loop from bind-off}

8. K across to the last 2 stitches before the bind-off, K2tog, turn

9. P across to the last 2 stitches before the bind-off, P2tog, turn

10. Repeat 8-9 until 18(24, 30, 36, 42) stitches remain.

Cut tail to weave in, place stitches on stitch holder.

11. Join yarn on back side with right side facing and repeat 8-9 until 18(24, 30, 36, 42) stitches remain.
Cut approximately 18(20, 24, 28, 30) inch minimum tail to work Kitchener seam: Place stitches from front and back on straight or DPN’s, with back side facing and wrong sides together. Thread tail onto tapestry needle

Always keep yarn below needles…
1. Insert tapestry needle into the 1st stitch on the front needle as if to purl.
2. Insert tapestry needle into the 1st stitch on the back needle as if to knit.
3. Insert tapestry needle into the 1st stitch on the front needles as if to knit and remove stitch from the needle.
4. Insert tapestry needle into the next stitch on the front needle as if to purl.
5. Insert tapestry needle into the 1st stitch on the back needle as if to purl and remove stitch from the needle.
6. Insert tapestry needle into the next stitch on the back needle as if to knit.

Repeat steps 3 to 6 until all stitches are bound off.


Leg Cuffs:

1. Pick up 44(48, 52, 56, 60) stitches, or multiples of 4, around leg opening on US 5 DPN’s.

2. K2p2 rib for 4(6, 8, 10, 12) rounds.

3. Bind off in pattern on US 6 needle.

Repeat for the second leg opening.

101_2168
The ribbing pattern offers a snug but stretchy leg cuff.


Weave in and trim all ends.


Drawstring:

Knit an I-cord, crochet a chain, or twist a drawstring, and weave through the waistband.

Large, Medium, Small


GIRLY OPTIONS:

Skirties


Rumba Butt:

Rumba

Special Instructions: Work second round after each short row set, from hip marker to hip marker across the back, in PURL (40, 48, 56, 64, 72 stitches) Continue with these instructions after completing soaker. Uses approx. 70(80, 90, 100, 110) yards additional yarn.

1, Pick up 40(48, 56, 64, 72) stitches in purl bumps on US 7.

2. Purl across, turn.

3. (K2, yo) across, K2, turn.

4. Purl across, turn.

5 (K3, M1) across, K2, turn.

6. Purl across, turn

7. Bind off.

Repeat for each set of purl bumps down the back of the soaker. Use the tails from each pick-up and bind-off to sew down the ends of each ruffle. Weave in and trim all ends. Dampen and finger block as needed.


Flirty Eyelet Skirty:

Flirty

Special Instructions: Work round 2 after the first short row set in PURL (80, 96, 112, 128, 144 stitches). Continue with these instructions after completing the soaker. Uses approx. 110(130, 150, 170 190) additional yards of yarn.

1. Pick up 80(96, 112, 128, 144) stitches around the soaker on US 7 circular or DPN’s.

2. Knit around.

3. (K4, yo) around.

4-6. K around.

7. (K5, yo) around.

8-10. K around.

11. (K6, yo) around.

12-14. K around.

15. (K7, yo) around.

16-18. K around.

19. (K8, yo) around.

20-22. K around.

23. (K7, K2tog, yo) around.

24-26, K around.

27. Repeat 23-26 for desired length.

Trim:

1. K around.

2. (K2, yo) around.

3. K around.

4. Bind off.

Weave in and trim all ends.


Cheer Skirty:

Cheer

Special Instructions: Work round 2 after the first short row set in PURL (80, 96, 112, 128, 144 stitches). Continue with these instructions after completing the soaker. Uses approx. 125(175, 200, 250, 275) additional yards of yarn.

1. Pick up 80(96, 112, 128, 144) stitches around on US 7 circular or DPN‘s.

2. Knit around.

3. (K8, M1Purl-wise) {Insert left needle from back and pick up the bar between the stitches, purl into the front}, around.

4-5. (K8, P) around.

6. (K8, P, M1Purl-wise) , around

7-8. (K8, P2) around.

9. (K8, P2, M1Purl-wise) , around

10-11. (K8, P3) around.

12. (K8, P3, M1Purl-wise) , around

13-14. (K8, P4) around.

15. (K8, P4, M1Purl-wise) , around

16-17. (K8, P5) around.

18. (K8, P5, M1Purl-wise) , around

19-20. (K8, P6) around.

21. (K8, P6, M1Purl-wise) , around

22-23. (K8, P7) around.

24. (K8, P7, M1Purl-wise) , around

25-30. (K8, P8) around. (Repeat an additional 10 rounds for Small, 20 rounds for Medium, 30 rounds for Large, 40 rounds for Extra Large.)

Bind off in pattern.

Weave in and trim all ends.

Get the .pdf here!...Li'l Aries Soaker .pdf

© Copywrite 2009 by Amy O’Holleran. This pattern is for personal use only. Items made using this pattern may not be produced for sale without my express permission. Thank you!


Become an authorized Li'l Aries Soaker Retailer
Pin It

Saturday, October 3, 2009

The Dream Scarf


Kelly's 'dream' scarf
Originally uploaded by tangledskeins
Yarn: Knit Picks Suri Dream ( 74% Suri Alpaca, 22% Peruvian Highland Wool, 4% Nylon) or a comparable yarn in 3 colors. Designate one as A, one as B, and one as C. Example uses Knit Picks Suri Dream in A:Gloxinia, B:Natural, and C:Aegean
US 11 and US 15 needles

Cast one 220 stitches on a US 15 needle (to maintain stretch) using long tail cast-on
knit onto US 11 (use until bind off)
knit in garter throughout in rows as follows:

2 rows in color A
4 rows in color B
4 rows in color C
4 rows in color A
4 rows in color C
4 rows in color B
3 rows in color A
bind off in color A using US 15
Pin It

Friday, September 18, 2009

Amy's Wrap, Newborn


101_2081
Originally uploaded by tangledskeins
I finished reworking my wrap pattern for newborns last night (as requested on the Yahoo Wool Soaker Group)

Using the original pattern (Crochet Wrap)...sized down in this manner...

Foundation chain with F hook
Rows 1-3 worked with D hook, switching back to the F at the final Ch1
Rows 4-60 worked with F hook, switching back to the D at the final Ch2
Rows 61-63 and side finishing worked with the D hook.

Back waistband measures 13 inches
Front waistband measures 9 inches
Rise measures 13 inches
Crotch width measures 8 inches
(all measurements unstretched)

101_2083
Pin It

Friday, August 21, 2009

Little Fire Sleep Sack


100_1967
Originally uploaded by tangledskeins
Features the same roomy back as the other Little Fire patterns, as well as lots of legroom for kicking :D

Newborn up to approx.15lbs

This pattern is worked with worsted weight wool yarn. Uses approx. 385 yds (example uses Knit Picks Wool of the Andes in Williamsburg and Maple Syrup)
Hook size G, Gauge 4 stitches per inch, 4 rows per inch in sc, or whatever hook you need to maintain gauge.


R1 Cast 56 dc’s using the No Chain double crochet. (initial ch3 plus 55 dc’s), and join in a loop, being careful not to twist. For step by step instructions on how to do the No Chain foundation see: http://serendipity.gpvm.com/no_chain.html

R2-R6 SLST around the first st of round 1, ch2, *BPDC around next st, FPDC around next st* repeat around and join with a SLST in the top of the Ch 2. (Bind off if you plan on using a different color for the body of the soaker, otherwise continue on to R7.)

R7 (If starting a new color, join with a SLST in the first DC) CH 1, SC in same st, and in next 2 sts, 2 SC in next st, *SC in next 3 sts , 2 SC in next st*, repeat *-*{14 increases} around, join with a SLST in the first sc 70scs

R8 Ch1, turn, SC in each stitch around, join with SLST in first SC. 70scs

R9-R11 Repeat R8

R12 CH1, turn, SC in first 2sts, HDC in next 4sts , DC in in next 23sts, HDC in next 4sts, SC in remaining 37sts, join with SLST to first SC.

R13-R16 Repeat rounds 9 to 12

R17-R20 Repeat rounds 9 to 12

R21-R24 Repeat rounds 9 to 12

R25-R72 Repeat round 8 (until garment measure 16 inches, approx 47 repeats) {You might be tempted to speed this section along by using dc…don’t…this will make larger ‘holes’ that could be problematic for tiny toes ;)}

R73 Ch1, turn, sc in first 4 sts, ch1 skip 1 sc, *sc in next 4 sts, ch1 skip 1 sc* Repeat *-* around, join with a SLST in first sc.

R74 Ch1, turn, sc in each sc and ch1 space around. Join with a SLST in the first sc

R75-R76 Ch1, turn, sc around, join with a SLST in the first sc

R77 Ch1, turn, reverse sc around for finishing, join, bind off, weave in ends.

Stitch closed the small V at the ribbing using the leftover tail before weaving in your end.

Make 2 drawstrings…one for the top waistband, one for the foot closure. Weave the first through the top ribbing, and the second through the bottom eyelet row.


100_1968100_1969


Photobucket
Pin It

Wednesday, May 27, 2009

Teacher appreciation...


100_0922
Originally uploaded by tangledskeins
My daughter Mady had the best Kindergarten teacher this year. Truely a parent could not ask for more. Not only that, but she must have the patience of a saint! Her class was not the traditional half day Kindergarten, but a full day class. A full day with 20 6 year olds...like I said, the patience of a saint! Anyway, as a little thank you to her for such a wonderful year, Mady and I made her a little pretty...Mady picked which beads and closure we would use, and I put it together...I decorated the little box with some scrapbook elements just to make it a little more special. Thanks for a wonderful year Mrs. M...here is hoping she is still there in a year when it is Reilly's turn!
100_0923
Pin It

Monday, May 18, 2009

Stevie the Spermie


100_0859
Originally uploaded by tangledskeins

My friend Steph and her hubby Steve are trying for their 8th child. In honor of that momentous feat, I made up this little keychain buddy. (I've since had another friend inquire about a baby toy sized version, so keep an eye out!)
Stevie the Spermie

Head:
With worsted weight yarn and size 4 dpn's, cast on 6 stitches.
(example uses Knit Picks Wool of the Andes in cloud)
R1-k6 around
R2-*k1, m1, k1* around
R3-*k2, m1, k1* around
R4-*k3, m1, k1* around
R5-*k4, m1, k1* around
R6-*k5, m1, k1* around
R7 to R9-k around
R10-k2tog, k3, k2tog
R11-k2tog, k1, k2tog
R12-k2tog, k1, k2tog
*do not bind off

Stuff Stevie's head with a tiny bit of polyfill or yarn scraps before continuing with the tail.

Tail:
R12+-3 stitch-cord for one inch
k2tog, cont. 2 stitch I cord for 1/2 inch
k2tog, cont single stitch for 1/2 inch.
bind off, leave a long tail.

Embroider his little face on with a scrap of dark wool (I used KP WotA in coal)

I fulled this little guy a bit by hand so the stitch definition would be less, but it really isn't necessary. After he had dried, I trimmed the yarn tail to about a quarter inch, and added a cute heart keychain fob.
Stevie the Spermie with keychain

Pin It

Wednesday, May 13, 2009

Gone Loopy Boa


100_0855
Originally uploaded by tangledskeins
I think this is going to be one of my favorite knit stitches yet...the loop stitch is so much fun! If you don't know how to do it, I have done a little video tut to help you out (with the help of my eldest daughter)


The pattern is very simple...

I'm using Lion brand Velvet Spun yarn in white, but I think this will work great with any plush yarn. I'm working it up on size 15 needles.

CO 3 stitches using the long tail cast on.

work 3 loop stitches as indicated in the video (knit first stitch, leave loop on left needle, pull working yarn through between worked stitch and remaining loop, catch over your thumb to make a large loop and bring back through the same space, knit loop on left needle, pass 1st knit stitch over, loop stitch created)

Continue knitting for length...I used 2 skeins of 54yds each for a nice long boa.
100_0857100_0858


Pin It

Saturday, May 2, 2009

Let it stretch!! Little Fire patterns

I have had a few people mention that they were having trouble getting the waistbands of the Little Fire wooly patterns loose enough to have enough stretch, even when using a larger hook for the foundation. I have found the answer...the no-chain foundation!! If you go here No Chain and scroll down to the bottom of the page, you will find instructions for doing the No Chain Double Crochet. Work this technique to length (one less dc than the number of dc's called for in the pattern) in place of the foundation chain and first row of dc in both Little Fire Patterns.
I tried it out myself on the Pirate shorties I just made for my son (incorporating a little stranding for a bit of fun) and it worked out fabulously. There is a small V at the join when following this technique, but it is easily stitched closed with the tail. The resulting stretchy waistband top is wonderful!
booty booty Pin It

Monday, March 23, 2009

Simple eyelet-edged mitts


000_0075
Originally uploaded by tangledskeins
These patterns are for 2 lengths with the same basic design. The design is very simple, and is a great project for practicing with dpn's. They are also very fast to work up, for those that like instant gratification, LOL. Cute in solid colors, as well as verigated (which awesomely in the colors I have worked up, leads to a cute striped effect!) :)

For both versions, cast on 30 stitches on size 8 dpns, using your preferred cast on (I used the long-tail method)

Short version:
000_0078000_0077
K1P1 rib for 15 rounds

K for 10 rounds

Bind off 8 stitches, continue knitting around

Cast on 8 stitches, continue knitting around

K 8 rounds

K2Tog y/o around

K 3 rounds

Bind off, Repeat for second mitt.


Long version:
000_0079
K1P1 rib for 10 rounds

K for 30 rounds

Bind off 8 stitches, continue knitting around

Cast on 8 stitches, continue knitting around

K 8 rounds

K2Tog y/o around

K 3 rounds

Bind off, Repeat for second mitt.

*edit...forgot the y/o in the k2tog rounds...oops!

Pin It

Thursday, March 5, 2009

Blanket of Rassilon...finished the seal!!

I finally finished the Seal of Rassilon motif on my Blanket of Rassilon! (see the other posts for how this project progressed;) I'm really glad I challenged myself with this one...doing crochet intarsia and teaching myself to carry colors so that the work is 'finished' on both sides...I do believe that I will be trying more projects like this in the future!
Pin It