
 Materials:
Yarn: Worsted Weight Wool
Recommended needles: US 6 straight (for cast on), US 5 circular or DPN’s (for waist and leg cuffs), US 7 circular or DPN’s (for body and girly options {as instructed in the Li‘l Aries Soaker Pattern}), US 8 (for leg cuff bind offs, and skirty bind-offs {as instructed in the Li‘l Aries Soaker Pattern})
Stitch markers, at least 4
Stitch holders or scrap yarn
Tapestry needle
Tape Measure
**Read all instructions carefully first.**
Suggested gauge: 5 ½ stitches per inch & 6 rows per inch in stockinet on US 7
General measurements (unstretched to slightly stretched)
NEWBORN= WEIGHT up to 11lbs WAIST 11-15 in. RISE 14-15in. INSEAM 5”
SMALL= WEIGHT 11-17 lbs WAIST 12-18 in. RISE 15-16 in. INSEAM 7”
MEDIUM= WEIGHT 15-20 lbs WAIST 12.5-20 in. RISE 16-17 in. INSEAM 9”
LARGE= WEIGHT 20-24 lbs WAIST 13-22 in. RISE 17-18 in. INSEAM 11”
X-LARGE= WEIGHT 25lbs+ WAIST 14-24 in. RISE 18-19 in INSEAM 13”
Weights are just an estimate as each baby is built differently. To measure for the waist, measure just above your baby’s diaper, around the waistline. To measure for the rise, measure over you baby’s diaper, from the top front to top back (approx from navel to mid-back). To measure the inseam measure from crotch to ankle on the inner part of the baby’s leg. If your baby fits within the measurement range for a particular size, use those figures in the pattern. If your baby fits most of the measurements for a particular size, use those figures in the pattern, and follow the customization instructions in those areas where your baby’s measurements differ.
Instructions are for Newborn(Small, Medium, Large, Extra Large)
Waist band:
Cast on 64(80, 96, 112, 128) stitches on US 6 needle (maintains stretch). Transfer stitches to US 5 circular or DPN’s, place stitch marker and join in a loop.
1. For a drawstring waistband: K2P2 Rib for 8(10, 12, 14, 16) rounds. You may wish to change yarn colors after your ribbing. (TIP* Tie the tails of your old color and new color in a tight bow as close to the needles as you can. This will make picking up the last increase stitch in the next section easier, keep the ends from pulling loose as you knit, and allow you to weave the ends in later.)
For an elastic waistband: Knit for 8(10, 12, 14, 16) rounds., Purl for one round, then work your K2P2 ribbing for 8(10, 12, 14, 16) rounds. You will eventually fold the band in at the purl round and sew it down over a loop of elastic with a length of yarn. To measure your elastic, the average is to subtract 10% from your baby’s waist measurement. (ex: Your baby’s waist measures 15 inches, 15-10%=13.5 inches, so you will cut your elastic 13.5 inches, and sew securely it in a loop with a needle and thread.) This option will also work for an encased drawstring.
Body:
Switch to US 7 circular or DPN’s
1. K4(5, 6, 7, 8), M1 (Insert left needle from the front and pick up the bar between the stitches, knit into the back.), around. (80, 96, 112, 128, 144 stitches)
2. K 2(3, 4, 5, 6) rounds.
3. K 20(24, 28, 32, 36) stitches, place hip marker, K 40(48, 56, 64, 72) stitches, place hip marker, K remaining 20(24, 28, 32, 36) stitches.
4. Work Wrapped Short Row Set:
Work around to the turning point (second hip marker placed), turn, yo purl-wise. {Purl-wise YO=bring yarn behind needle and insert needle into first stitch purl-wise}…Purl across to the turning point (first hip marker placed), turn, yo knit-wise…{Knit-wise YO=bring yarn in front of needle and insert needle into first stitch knit-wise}…Knit across to the last stitch before the marker, slip that stitch purl-wise, remove marker, replace stitch on left needle, place marker on right needle. K2tog (yo and 1st stitch after the ‘gap’) Continue knitting around past the joining marker, to the stitch before the next hip marker. Slip that stitch knit-wise, remove the marker, slip the next stitch knit-wise, knit those 2 stitches together (as in SSK), place marker on right needle. Continue knitting around to the joining marker
5. K 2(3, 4, 5, 6) rounds.
6. Repeat 4&5 3 more times. (If you want even more rear coverage add an extra repeat of round 4 here, adding about ½ inch to the total rise measurement for the size you are working in step 7)
7. Knit until the total rise (front and back together) measures 12(13, 14, 15, 16)inches. If you need a longer rise than is listed in the chart above for the size you are making, add additional rounds here (6 round per inch). On the last round, count 20(24, 28, 32, 36) stitches from the first hip marker and place a marker for the rear gusset placement.

Gusset:
1. Knit around to 3(4, 5, 6, 7) stitches past joining marker.
2. Purl back 3(4, 5, 6, 7) stitches past joining marker, turn (you will have a total of 6, 8, 10, 12, 14 gusset stitches at this point)
3. K1, M1, k to last stitch, M1, K1, turn
4. Purl across, turn
5. Repeat 3 and 4 until there are 12( 16, 20, 24, 28) gusset stitches on your needle.
Cut tail to weave in and slip gusset stitches onto a stitch holder or dpn
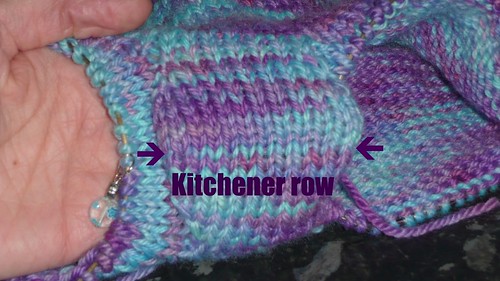
8. Place the next 34(40, 46, 52, 58) stitches on a stitch holder or scrap yarn (to 3(4, 5, 6, 7) stitches before rear marker). Join a new yarn and follow gusset instructions for the rear half of the gusset, cutting a tail that is at least 12(14, 16, 18, 20) inches long for seaming and thread onto a tapestry needle. Kitchener the gusset together…
Always keep yarn below needles…
1. Insert tapestry needle into the 1st stitch on the front needle as if to purl.
2. Insert tapestry needle into the 1st stitch on the back needle as if to knit.
3. Insert tapestry needle into the 1st stitch on the front needles as if to knit and remove stitch from the needle.
4. Insert tapestry needle into the next stitch on the front needle as if to purl.
5. Insert tapestry needle into the 1st stitch on the back needle as if to purl and remove stitch from the needle.
6. Insert tapestry needle into the next stitch on the back needle as if to knit.
Repeat steps 3 to 6 until all stitches are bound off.

Legs:
1. Join a new yarn and pick up 10(12, 14, 16, 18) stitches along the edge of the gusset, place a marker and knit around the leg opening for 30(42, 54, 66, 72) rounds You will have 44(52, 60, 68, 76) leg stitches. If you need a longer inseam than is listed in the chart above for the size you are making,, add additional rounds before beginning a cuff option. (6 rounds per inch)
Leg options:
1. Work only 12(14, 16, 18, 20) rounds for shorties
2. Work only 15(21, 27, 33, 39) rounds for “board” shorties
3. Work only 20(28, 36, 44, 52) rounds for Capri’s

Cuff options:
1. Knit to last round in stockinet for a rolled cuff
2 Knit the last 3 or 4 rounds in seed stitch for a straight cuff.
3. Switch to US5 DPN’s and knit the last 4(6, 8, 10, 12) rounds in K2P2 ribbing for a ‘sweatpants’ cuff (bind off with US6 for this option)
4 Knit the last 2 rounds in K2M1 for a ruffled cuff
5. Knit the last 8(10, 12, 14, 16) rounds increasing about 4 stitches per round and using the ruffle cuff at the bottom for a flared leg.
6. Work a swirled cuff by knitting the last 9 rounds as follows: 3 rounds garter, 3 rounds K1P1, and 3 more rounds garter.
7. Work the last 6 rounds in box stitch…K2P2 for 2 rounds, P2K2 for 2 rounds, K2P2 for 2 rounds.
8. Work a double ruffle by purling one round at the bottom of the leg, knitting each stitch front and back the next round, and knitting 4 more rounds and binding off, then pick up both the top and bottom purl bumps of the purl row and knitting 4 more times around
(You can work other edging patterns as long as they are worked in multiples of 2 or 4 stitches)
Bind off with a size 8 needle unless otherwise indicated, and in stitch pattern as needed.
Repeat for the second leg opening, picking up stitches from the stitch holder or scrap yarn and across the gusset as indicated for each size.
Footie option:
Work the sweatpants cuff option as directed for the size you are making. Do not binding off. Set up your US5 DPN’s as follows: Beginning at the center back of the leg, place 16(19, 22, 25, 28) stitches on the first needle (referred to as needle 1). Place the next 12(14, 14, 18, 20) stitches on the second needle (referred to as ‘toe’), and the remaining 16(19, 22, 25, 28) stitches on the third needle (referred to as needle 3). Place marker.
1. Knit the stitches on needle 1
2. A) Knit the toe stitches across, turn
B) Purl the toe stitches across, turn
Repeat A&B 1(2, 3, 4, 5) more times (4, 6, 8, 10, 12 rows of K and P)
Knit across toe once more
3. Pick up 5(7, 9, 11, 13) stitches along the side of the toe and knit the stitches on needle 3
4. Knit across needle 1, picking up 5(7, 9, 11, 13) stitches along the other side of the toe and k around to the marker.
5. K an additional 3(5, 7, 9, 11) rounds
6. **SSK first 2 stitches on needle 1, K remaining stitches on needle 1.
K2tog the first 2 stitches of the toe, K across to last 2 stitches, SSK
K to last 2 stitches of needle 3, K2tog **
Repeat ** to ** until only 2 stitches remain on the toe needle.
Slip the 2 remaining toe stitches onto their nearest DPN and Kitchener the sole closed. Pull the yarn to the inside and weave in.
Repeat for leg 2.

pic'd with hat, pattern coming soon!
Drawstring: Knit an I-cord, crochet a chain, or twist a drawstring, and weave through the waistband.
© Copywrite 2010 by Amy O’Holleran. This pattern is for personal use only. Items made using this pattern may not be produced for sale without my express permission. Thank you!
A huge thank you to all of my testers for their amazing help, and a special thanks to Sally for the use of her pictures (the mint and purple colorway)!!

6 comments:
WOW that looks GREAT!! I can't wait to try out the pattern!
I just finished a pair of your soakers and was looking for longies:)
Thanks for your generosity in sharing your patterns with us.
These are so adorable! I wish my grandbabies wore cloth diapers. Although I imagine these can be worn just as pants.
Hello, I would like to knit longies with snaps on legs. If you know of any pattern I would very greatful if you could help me. Thanks
For those interested in licensing, I have added a picture link above to the Crafters section of my Etsy, where I am now offering licensing on the Little Fire series and the Li'l Arie series!
http://www.etsy.com/shop/tangledskeins?section_id=7200060
FInished these pants for our 16mo old a couple of weeks ago. The best pattern I've found so far. I love the way they turned out. I am always hesitant to purchase a pattern since it's hard to know how they fit, so I really appreciate you for sharing this.
Post a Comment