With a concern for the number of single use water bottles my kids could go through in a given week (recycleable, yes, but sooo wasteful) I've given them all reusable water bottles. In an effort to combat the sweating that happens with any cold beverage, I have worked them up some 'No Sweat" cozies. These are so simple to do.
All were made with different novelty yarns (ribbon, funfur, component yarn)
The first 2 on the left were made by crocheting on size I hook
4chains into a loop, working 2 chains, then working 12 dc's and joining with a slst to form a ring.
Slip stitch to the space between the first 2 dc's, chain 2 and dc in the same space, 2 dc in next space, and around, joining with a slip st.
Slip st to the space between the first 2 dc's, ch3, and dc in the next space, **ch1, dc in next space**, around. join w/ slip st.
Slip the first space between the first 2 dc's, ch3, and dc in the next space, **ch1, dc in next space**, around. join w/ slip st.
Continue in this fashion until the cozy is tall enough to reach the neck of your bottle...it will stretch a bit, so check frequently for size.
Bind off and run a drawstring in and out of the last row of dc's.
The 3rd cozy is also crochet, also on size I, and for the first 2 rounds, is worked the same as above, but instead of continuing in dc's all the way up, ch 5 and sc into the dc spaces, working a couple of slip stitches at the end of each round so that you are starting the next round around the 3rd chain of each ch5 set.. To finish, work a round of **sc, ch1* around the top, then a round of **dc, ch1** ,bind off, weave a drawstring through the final dc row.
The fourth design was worked up on the small blue Knifty Knitter with a boucle yarn. It was a bit of a "collaboration" with my 9yo dd (ie, she did some, mom did most, LOL) She has a thermos style bottle, but still wanted a cozy. We worked about 15 rounds, worked a crochet bind off, adding in a large coordinating hairtie elastic, basically just encasing the elastic within the sc bindoff, cinched the bottom closed and secured it firmly. It just slips over the bottle like a sock, and is held up really will by the elastic, much better for this type of bottle,as it won't slip off too easily.
Pin It

. . . . . .Where all of the crafty chaos comes together!
Wednesday, July 16, 2008


Thursday, July 10, 2008
The "Totally Mindless" Fashion scarf
Sometimes I really don't want to have to pay attention to what I am doing while watching tv or a movie. At those times, I will pull out a ball of fun fuzzy yarn and do some finger knitting. (Usually scored from the $tree or 99cent stores...can't beat those prices!) I learned (a lifetime ago) at summer camp ((Picture a tent garlanded with miles of gaudy yarn tubes, LOL)). For this technique (if you don't know how to finger knit, check out http://www.knitty.com/issuesummer06/FEATfingerknitting.html ) I don't use all 4 fingers like you normally would, but just 2. I "knit" the entire ball into a long (and much thicker) strand, then "knit" the resulting strand, again using just 2 fingers. I weave in the tails that are left from the first "knit-through", and voila!! I much prefer this technique over simply doing a 4-finger finger knit, as the resulting 'fabric' will be a bit denser, with less stretch than the traditional finger knitting. You really do not want too much stretch on long scarves like these. Since all balls of yarn are not created equal, there will some variation from scarf to scarf. The ones pictures here are from left to right...Bernat Bling Bling in "Moulin Rouge", Bernat Bling Bling in "Night Club", Lion Brand Fancy Fur in "Tiger Eye", and Lion Brand Festive Fur, in a colorway I can't locate, LOL. They make super quick and easy last minute gifts. My eldest dd likes to make these for her friends on their birthdays.
Pin It

Pin It
Friday, June 27, 2008
Waste not, want not...Fulling and felting
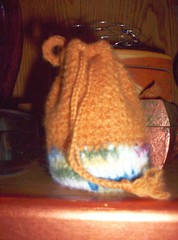
I hate wasteing anything...I save every scrap of fabric, even the tiniest bit to add to stuffings. I also save every tiny bit of my wool yarn scraps. I keep a small bag in with my knitting and crochet supplies, and whenever I need to trim ends, I stick them in the bag. After a year of knitting and crocheting, I have quite a bit. A few nights ago, I sat down and started going through the odds and ends (while watching a late night movie). I took the longer pieces and spliced them together, and took the shorter pieces and seperated them into fibers in a little bowl. Once I had all of the pieces either spliced or seperated, I set the bowl of fibers aside and set to work on a little freeform crochet. I wanted to make a little bag, but since I really had no idea how much yarn I had, played it all by feel. I crocheted the bag about 4 inches in diameter and about 7 inches high in SC, added a final row in 2DC, CH1(skip 1)2DC around the top for a drawstring, added a chained loop at the back, and sc'd around the loop for added stability. I secured it really well, bound off, wove ends. In the morning I tossed it in the washer and dryer with a load of clothes to full. The final dimensions are 3 inches in diameter by 4 inches tall.I had to reopen the drawstring holes a little bit with a knitting needle in order to weave through the braided drawstrings, and I stretched the back loop out a bit with a larger knitting needle so it would more easily fit on a belt or Mei Tei strap. I can't wait to use it!

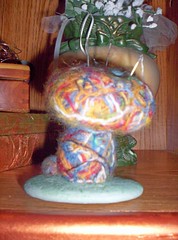
With the fibers...I dumped the whole lot into a large rectangular plastic storage container, made sure that the fibers were spread out to roughly the same thickness, added a dribble of baby shampoo and some hot water, adding more water bit by bit as need, I basically patted the fibers together, flipping the "fabric" and patting until they really began to felt together, I added a bit more hot water to heat the fibers up a bit, squeezed out some of the excess water, then placed the "fabric" on a bamboo mat on a towel, and rolled and pressed, rolled and pressed, adding more hot water to heat it back up every now and then. After about 15 min of this process I had a very unique and durable piece of felt. I wanted to do something a litle different with it, so I set it aside. While playing on Ravelry, I was inspired by a collection of crocheted mushrooms...Playing off of that inspiration, I cut, stitched, and stuffed...even added a few button 'spots'. I had some little trimmings left, which I felted into a small ball...the perfect baby mushroom ;) Zero waste on this project, lol. I took a flat river rock, painted it with a couple of different shades of green, then hot glued my pincushion mushroom, and the baby mushroom ball to the top...isn't it cute?? It was put into immediate use, lol...there are always stray pins and sewing needles floating around, lol.
 Pin It
With the fibers...I dumped the whole lot into a large rectangular plastic storage container, made sure that the fibers were spread out to roughly the same thickness, added a dribble of baby shampoo and some hot water, adding more water bit by bit as need, I basically patted the fibers together, flipping the "fabric" and patting until they really began to felt together, I added a bit more hot water to heat the fibers up a bit, squeezed out some of the excess water, then placed the "fabric" on a bamboo mat on a towel, and rolled and pressed, rolled and pressed, adding more hot water to heat it back up every now and then. After about 15 min of this process I had a very unique and durable piece of felt. I wanted to do something a litle different with it, so I set it aside. While playing on Ravelry, I was inspired by a collection of crocheted mushrooms...Playing off of that inspiration, I cut, stitched, and stuffed...even added a few button 'spots'. I had some little trimmings left, which I felted into a small ball...the perfect baby mushroom ;) Zero waste on this project, lol. I took a flat river rock, painted it with a couple of different shades of green, then hot glued my pincushion mushroom, and the baby mushroom ball to the top...isn't it cute?? It was put into immediate use, lol...there are always stray pins and sewing needles floating around, lol.
 Pin It
Friday, June 20, 2008
Dalmation Minkee pocket diaper
I love Minkee! it is soooo soft and cozy, and makes the sweetest diapers! I was able to scrounge up just enough elastic to work up one more pocket (REALLY need to go to the fabric store!) Isn't it adorable?


closed, the outside, and the inside...the big improvement to my design there is the addition of the inner gussets...they add a few extra steps to construction, but make a huge difference!

and here is my darling boy modeling my work...it is still a bit big on him, but that just gives room to grow in :) Pin It
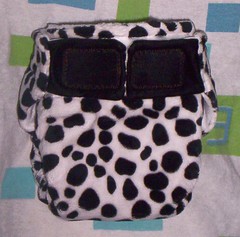

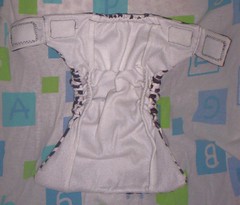
closed, the outside, and the inside...the big improvement to my design there is the addition of the inner gussets...they add a few extra steps to construction, but make a huge difference!

and here is my darling boy modeling my work...it is still a bit big on him, but that just gives room to grow in :) Pin It
Monday, June 9, 2008
Mama cloth...reusable tampons
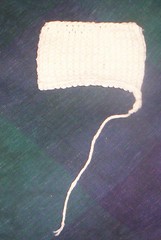
Ok...I know some of you might think I'm nuts. Maybe I am, LOL. I continue to try and find as many ways to cut unneeded spending and reduce the amount of waste that we as a family contribute to the landfills as I can. I figure every little bit helps. We live just a few miles from our local landfill, and I am appalled by the number of garbage trucks, not to mention private vehicles, that go down our road every day headed to the dump. I was intrigued by the idea here http://www.borntolove.com/d-list7-make.shtml of reusable tampons...I really hate pads...I haven't tried cloth pads (I plan on making a bunch for my older girls though, as they are now at the age to need them...eegads!!), but I had a bit of a brainstorm...I had some scraps of organic hemp/organic cotton fleece leftover from making a sling and some diaper doublers for my son(I seriously hate to throw out even the littlest bits)...I cut rectangles about 2 1/2 by 3 1/2 inches, stacked two together and attached the layers as well as a strip of ribbon yarn together using an overlock stitch. I cut the tails of the ribbon about 4 inches long, and at the moment they are in the wash getting 'fluffed'...more to come...

The rectangles of hemp/cotton fleece pinned to the ribbon yarn.
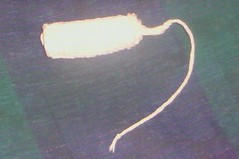
After they were washed and dried, they look like they will work really well...they roll up pretty easily, and since the layers were not sewn all the way around, they will wash and dry super easy. These also have the added benefit over the idea linked above (which is genious, btw) of the ribbon for easier extraction.

I found a cute little drawstring bag to store them in...

It is interesting to hear that I am not alone in my nutso-ness...I was given this link by a fellow crafty mama to a whole (LONG) discussion on the topic, and various alternatives...http://www.craftster.org/forum/index.php?topic=82588.0 Which, of course, got me thinking, and playing around with a little organic cotton yarn (the brand escapes me, as the label has disappeared). I took off on one of the ideas that was discussed on the above thread for a drawstring style knit tampon...I cast on 13 stitches with a 2 tail cast on, size 4 dpn's, worsted weight cotton, and knit in the round for 16 rows, then bound off by slipping all of the stitches onto a tapestry needles like you would with a hat (just a very very tiny hat, LOL), I then ran a piece of yarn through the cast on row for a drawstring

I stuffed this one with cotton balls, just to see how it looked...

Then I had another brainstorm...combine the knitting aspect with my original easy clean roll up idea...again on size 4...this time a 12" circular...same worsted weight cotton...I cast on 20 sts, knit stockinette for 16 rows, bound off 18, knit an I cord for 4 rows, bound off, and left a long tail. Easy peasy, and becasue of stockinettes natural tendency to curl, it rolls up super easy!

 Pin It
The rectangles of hemp/cotton fleece pinned to the ribbon yarn.
After they were washed and dried, they look like they will work really well...they roll up pretty easily, and since the layers were not sewn all the way around, they will wash and dry super easy. These also have the added benefit over the idea linked above (which is genious, btw) of the ribbon for easier extraction.
I found a cute little drawstring bag to store them in...
It is interesting to hear that I am not alone in my nutso-ness...I was given this link by a fellow crafty mama to a whole (LONG) discussion on the topic, and various alternatives...http://www.craftster.org/forum/index.php?topic=82588.0 Which, of course, got me thinking, and playing around with a little organic cotton yarn (the brand escapes me, as the label has disappeared). I took off on one of the ideas that was discussed on the above thread for a drawstring style knit tampon...I cast on 13 stitches with a 2 tail cast on, size 4 dpn's, worsted weight cotton, and knit in the round for 16 rows, then bound off by slipping all of the stitches onto a tapestry needles like you would with a hat (just a very very tiny hat, LOL), I then ran a piece of yarn through the cast on row for a drawstring

I stuffed this one with cotton balls, just to see how it looked...

Then I had another brainstorm...combine the knitting aspect with my original easy clean roll up idea...again on size 4...this time a 12" circular...same worsted weight cotton...I cast on 20 sts, knit stockinette for 16 rows, bound off 18, knit an I cord for 4 rows, bound off, and left a long tail. Easy peasy, and becasue of stockinettes natural tendency to curl, it rolls up super easy!
 Pin It
Wednesday, June 4, 2008
My first Minkee pocket!
First...I LOVE my new sewing machine...I was able to whip out 2 of these beauties (before I ran out of elastic, and they have polar fleece hidden layers because I haven't gotten my PUL yet), and they are just YUMMY!! My ds is only 2 1/2 mos old, but he loves these dipes! It is so funny to see him 'petting' his dipe, LOL. I think I may make the rest with a bit of a higher rise and longer tabs, but I am really happy with the overall design. Too bad it took me 6 years to figure out my pattern, LOL. Making changes one by one over the years, I think I have hit on the best overall design, and fabric combinations. This Minkee stuff is sooo soft
Pin It

Pin It
Monday, June 2, 2008
My new sewing machine!
Oh boy oh boy oh boy!! I have got to send out the biggest THANK YOU to my darling hubby's aunt Linda...she ordered me a new sewing machine, and it just arrived...HOLY COW...this is going to be fun...I have a TON of new techniques to learn, this thing has WAY more than the 3 stitches my old machine has. I've only had time to try it out on a couple of straight seams, but it sews those gourgeously! I'm so excited It even does overlock stitch, so I don't even need to keep shopping for a serger...at least not right now, LOL.
Pin It

Pin It
Sunday, June 1, 2008
Recycled sweater wrap
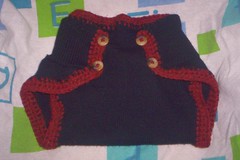
I had an old wool sweater that I never wear lying around....I took one of the wraps I already have and used it as a pattern. I lined the top of the wrap up with the waistband of the sweater and cut through both layers...giving me 2 new wraps. I crocheted a boarder and buttonholes around the cut edge (Peace Fleece Volgasippi Blue), put on 2 rows of buttons, and voila! I still have the second one to work on tonight once the little ones are down.
eta>>> I was finally able to finish the second wrap...this one is edged in Peace Fleece Sheplova Mushroom.
 Pin It

eta>>> I was finally able to finish the second wrap...this one is edged in Peace Fleece Sheplova Mushroom.
 Pin It
My new knit soaker
pattern is coming along...this is the second workup of the design, and I think with a couple more tweeks here and there, it will be ready to share!
Pin It

Pin It
Tuesday, May 27, 2008
Playsilks!!
I got the playsilks I ordered for the little ones today...
They arrived individually wrapped and plain white...

The girls had a blast opening all of the packages and stuffing them in the vinegar/water bath to soak.
We went to town dying...we used leftover easter egg dyes for some of them, and drink mixes (kool-aid, etc.) for the rest, with the stovetop method....basically throw a few packets of mix, a glug of vinegar and a few cups of water in a large pot, heat it up, toss in a silk or two, submerge in the dye, and stir for a few minutes while the color soaks into the silk, then pull it off the heat when all or most of the color is in the silk, and rinse in cool water until it runs clear, wring out, and hang outside. Later I will give them a wash and dry in the machine to set the colors well. I couldn't find my gloves, so my hands got a good dying too, LOL


And now my girlies have a fun new activity!!

The nice neat pile didn't last much longer than it took me to snap the pic, LOL...I knew that they would have a blast with these!
ETA>>>
Reilly really took to them...


And so did Mady...


Pin It
They arrived individually wrapped and plain white...

The girls had a blast opening all of the packages and stuffing them in the vinegar/water bath to soak.
We went to town dying...we used leftover easter egg dyes for some of them, and drink mixes (kool-aid, etc.) for the rest, with the stovetop method....basically throw a few packets of mix, a glug of vinegar and a few cups of water in a large pot, heat it up, toss in a silk or two, submerge in the dye, and stir for a few minutes while the color soaks into the silk, then pull it off the heat when all or most of the color is in the silk, and rinse in cool water until it runs clear, wring out, and hang outside. Later I will give them a wash and dry in the machine to set the colors well. I couldn't find my gloves, so my hands got a good dying too, LOL


And now my girlies have a fun new activity!!

The nice neat pile didn't last much longer than it took me to snap the pic, LOL...I knew that they would have a blast with these!
ETA>>>
Reilly really took to them...


And so did Mady...


Subscribe to:
Posts (Atom)