Sunday, February 15, 2009

Spiraled Crochet Wool Ball

This ball was inspired by a conversation about the dryer balls below...this design may work for dryer balls if stuffed solidly enough...they didn't turn out quite like I had in my head (I think for the effect I was trying to go for, I may need to go to knitted instead...stay tuned ;)), but is still super cute, and my son is enjoying a new all natural toy!

Each ball is worked in two panels that are then whip stitched together and stuffed.
Hook: G
yarn: Worsted Weight wool...example uses Knit Picks wool of the Andes in Maple Syrup and Williamsburg

Special stitch: Double Crochet Puff...yarn over, insert hook, yarn over, pull up a loop, yo and pull through 2 loops on hook (2 loops remain)yarn over, insert hook, yarn over, pull up a loop, yo and pull through 2 loops on hook (3 loops remain), yarn over, insert hook, yarn over, pull up a loop, yo and pull through 2 loops on hook (4 loops remain), yarn over, insert hook, yarnover, pull up a loop, yo and pull through 2 loops on hook, (5 loops reamin), yarn over and pull through all 5 loops on hook...puff created (the single chain or slip stitch that follows each puff in the pattern will make it 'pop'.)

R1 Chain 2, and work 6 sc's in the second chain from hook, join with a slip stitch in the first sc
R2 Ch1, (sc, work puff) around, join with a slip stitch in the first sc
R3 Ch 1, *(sc, puff) in next st*, sc in next st, repeat ** around, join with a slip stitch in the first sc.
R4 Ch 1, *(sc, work puff) in next st*, sc in next 2 sts, repeat ** around, join with a slip stitch in the first sc.
R5 Ch 1, *(sc, work puff) in next st*, sc in next 3 sts, repeat ** around, join with a slip stitch in the first sc.
R6 Ch 1, *(sc, work puff) in next st*, sc in next 4 sts, repeat ** around, join with a slip stitch in the first sc.
R7 Ch 1, *(sc, work puff) in next st*, sc in next 5 sts, repeat ** around, join with a slip stitch in the first sc.
R8 Ch 1, *(sc, work puff) in next st*, sc in next 6 sts, repeat ** around, join with a slip stitch in the first sc.
R9 Ch 1, *(sc, work puff) in next st*, sc in next 7 sts, repeat ** around, join with a slip stitch in the first sc.
R10 Ch 1, *(sc, work puff) in next st*, sc in next 8 sts, repeat ** around, join with a slip stitch in the first sc.
Bind off

Repeat for other half.

100_0104

Line up the puffs of each half and whip stitch around, leaving an opening for stuffing, stuff as desired, then whip closed. (Example was moderately stuffed with organic cotton, but you can use polyfil, batting, wool roving, or a ball of yarn to stuff)

100_0115

The ball is now finished...at this point you can leave it as is, or you can felt it.

I felted this one by hand, as I wanted to be able to control the rate of felting and make sure that the swirls created by the puffs were maintained.

100_0116

Use as desired...a dryer ball, a juggling ball, or a fun and safe baby toy :) Pin It

Wednesday, February 4, 2009

Wooly dryer balls!

Fed up with the rubber odor of the store-bought dryer balls I had been using, I decided to make some wooly felted ones.

Step one...the core...I wound a ball of scrap acrylic until it was about 7 1/2-8 inches in circumference.
000_1120

Step two...winding the wool...I chose to use Knit Picks Wool of the Andes, as if felts up so nicely, but you can use any non-superwash wool. Each ball takes about 50 yards. Wind the wool yarn snugly around the core ball so that all of the core is covered evenly.
000_1121

Step Three...securing the tail...using a crochet hook, secure the tail under loops of yarn until there is no more hanging out.
000_1123
000_1125

Step Four...preparing for the first felting...tie the completed balls into a lingerie bag or a nylon stocking to keep them from unraveling, and toss in the washer, then the dryer.
000_1127

Step Five...the second felting...remove the ball(s) from the lingerie bag or stocking, and wash and dry again (at this point they will NOT unravel!)
000_0038
The ball on the right has been felted once, the ball on the left, twice.

At this point they do not really need to be felted anymore, but you can repeat step five as many times as you like.

Use in place of dryer sheets (which can diminish the life of you dryer, cause buildup on clothes...especially cloth diapers, or cause allergic reactions for some people). I ended up making 4 of these balls, and they work wonderfully. My clothes and cloth diapers are coming out of the wash fluffier and softer than ever! They work even better than the store-bought variety, and don't have the unpleasant rubber odor!

Another great felting wool is:
Pin It

Monday, January 19, 2009

Tardis mp3 cover!!

**Warning**...Doctor Who fanatics in the house, lmao...

tardis2

It's bigger on the inside!!!

the Tardis mp3 cover!!

How cool is this??
An mp3 player is like a Tardis....both are bigger on the inside and can take you to new and interesting places!!
I love love love it!! Of course I had to make a second one for my eldest dd...I've gotten her fully hooked on the Doctor, LOL.

Tardis MP3 Cover

This was worked with worsted weight yarn(example uses TLC Essentials Shaded Denim) on size 4 needles
(the knits and purls create the effect of the door panels...loooove it!)

Cast on 27 stitches using 2-tail cast on
R1 (P6, K1)3 TIMES, P6
R2 (K1, P4, K1, P1)3 TIMES, K1, P4, K1
R3 (P1, K1, P2, K1, P1, K1)3 TIMES, P1, K1, P2, K1, P1
R4 (K1, P1, K2, P1, K1, P1)3 TIMES, K1, P1, K2, P1, K1
R5 (P1, K4, P1, K1)3 TIMES, P1, K4, P1
R6 (K6, P1)3 TIMES, K6
R7 SAME AS R5
R8 SAME AS R4
R9 SAME AS R3
R10 SAME AS R2
R11 SAME AS R1
R12 SAME AS R2
R13 SAME AS R3
R14 SAME AS R4
R15 SAME AS R5
R16 SAME AS R6
R17 SAME AS R5
R18 WITH BLUE K1, P1; WITH WHITE K2; WITH BLUE P1, K1, P1, K1, P1; WITH WHITE K1, P1;
WITH BLUE P1, K1, P1, K1, P1; WITH WHITE K1, P1; WITH BLUE P1, K1, P1, K1, P1; WITH
WHITE K1, P1; WITH BLUE P1, K1
R19 WITH BLUE P1, K1; WITH WHITE P2; WITH BLUE K1, P1, K1, P1, K1; WITH WHITE P2;
WITH BLUE K1, P1, K1, P1, K1; WITH WHITE P2; WITH BLUE K1, P1, K1, P1, K1; WITH
WHITE P2; WITH BLUE K1, P1
R20 SAME AS R4
R21 SAME AS R1
R22 PURL ALL
R23 K8, P11, K8
R24 P8, K11, P8
R25 SAME AS 23
R26 PURL ALL
R27 KNIT ALL
KNIT BIND OFF

SEAM BACK, FOLD FLAT WITH BACK SEAM CENTERED, SEAM BOTTOM

LIGHT BUTTON
WITH WHITE FINGERING YARN OR EMBROIDERY FLOSS, , LEAVE A LONG TAIL AND CH 1 ON SIZE 1/2.75mm HOOK. WORK 8 SC’S IN THAT CH, CONTINUE WORKING AROUND WITH A SC IN EACH SC, REPEAT, CUT AND PULL YARN THOUGH LAST LOOP STUFF BUTTON WITH LONG BEGINNING CHAIN AND SEW CLOSED BY WHIP-STITCHING IN THE INSIDE LOOPS OF THE LAST ROUND. SECURE BY SEWING TO THE TOP FRONT CENTER OF THE COVER.

LOOP…SEW ON A LOOP OF ELASTIC CORDING OR CROCHET A LOOP USING ELASTIC STRING DIRECTLY ONTO THE COVER AT THE TOP BACK SEAM

EMBROIDER ‘POLICE BOX’ IN THE KNIT PANEL AT THE TOP FRONT OF THE COVER

STOW YOUR MP3 PLAYER INSIDE…(mine is an RCA OPAL...about 3 1/2"X2", but dd was also able to get her Nokia phone into hers!)

Here is a chart that may (or may not, LOL)help!

tardischart

Pin It

Saturday, January 17, 2009

Luna Lovegood's Tote

For all my fellow Harry Potter fans, I have worked up a (passable) version of the tote carried by Luna Lovegood in the Order of the Phoenix. It is not a perfect replica...try as I might, I couldn't find a single yarn that mimiced the woven pattern on the (obviously sewn fabric) bag from the film, but I think this one is just about close enough.


Luna Lovegood’s Tote

G hook, worsted weight yarn (example uses TLC Essentials Shaded Denim)

Strap:
Ch 9
R1 sc in 2nd ch from hook and in each ch across
R2 ch 1, turn, sc in each sc across (8)
R3 Repeat for about 40 inches, do not bind off.
R4 work 2 more sc in last sc of final row (turn corner) and sc evenly along the side, work 3 sc in in the first free loop at the ‘bottom (turn corner), and sc in the next 6 free loops. Work 3 sc in last free loop (turn corner), sc evenly along side, work 1 sc in the first sc of the last row and join in the same st with a slip stitch, bind off.

Bag panel (make 2):
Ch 49
R1 sc in second ch from the hook and in each ch across
R2 ch 1 turn, sc in each st across
R3 Repeat for 10 inches, bind off
R4 Join yarn with a slip stitch in the 6th sc from the bind off, ch1, sc in same st and sc across leaving 5 stitches at the end unworked
R5 ch 1, turn, sc across
R6 Repeat R5 3 more times and bind off

Repeat for second panel

Lay panels together with wrong sides facing, crochet together along each side and bottom, fold the bottom ‘cutout’ portion flat and crochet closed on both ends., attach handle with about a 2-3 inch overlap on each side, centering on the side seams. Work a round of sc around the top of the bag, bind off. Weave in and trim all ends, voila!!


And just because I love it so much,
Pin It

Tuesday, December 9, 2008

Little Legs...


000_0526
Originally uploaded by tangledskeins
crochet baby (to about age 6) legwarmers {or armwarmers for age 6+}

Little Legs:

Yarn, sport weight
Size F hook
No actual gauge.

Ch40, join in a ring being careful not to twist the chain.

Cuff:
R1 Ch2, dc in next chain and in each around, join

R2 Slst around ch2, ch2 (count as fpdc), work bpdc around next dc, (work fpdc around next dc, work bpdc around next dc)repeat around, join w/slst in ch2

R3 Repeat previous row twice more OO

Body:
R4 Ch2, dc in next st and in each st around , join w/slst in ch2

R5 Repeat previous row 19 times more OOOOOOOOOOOOOOOOOOO

R6 Ch2, decrease next 2 sts together, work dc in each st around to last 2, decrease next 2 sts together, join w/slst in ch2

R7 Repeat previous row 3 times more OOO

Cuff:
R8 Ch2, dc in each st around, join w/slst in ch2

R9 Slst around ch2, ch2 (count as fpdc), work bpdc around next dc, (work fpdc around next dc, work bpdc around next dc)repeat around, join w/slst in ch2

R10 Repeat previous row twice more. OO
Bind off and weave in ends.

Note:
For stripes, I have found that I prefer to have 3 round stripes in the body…single rounds either left a LOT of tails to weave in when cut, or not as much stretch when carried


For the cream baby headband pictured above:
CH 70 (add length by 2's for a larger headband) and join in a loop, being careful not to twist the chain.
R1 ch 2 (count as first dc) and dc in each ch around, join with a slst in the top of ch2.
R2 slst around ch2, ch2, work bpdc around next dc, work fpdc around next dc, work bpdc around next dc), continue around, and join with a sl st in the top of ch 2.
R3+ Repeat round 2 for desired width, bind off, weave in ends. Decorate as desired. The example is decorated with a 6 petaled freeform flower and a shank button.


000_0689 *example features a baby newsboy hat...this pattern will be added later :) Pin It

Wednesday, December 3, 2008

UPDATE: Correction in Little Fire Pants pattern

I have made a correction to the Little Fire Pants pattern (link in list at left of screen). Thanks again to my wool soaker group mamas...you ladies rock! If you have printed out the pattern already, please print out the updated version. There was an error in the large and extra large sizes that required a rewrite of the short row section. I apologize for any inconveniences...happy crocheting!! Pin It

Thursday, November 20, 2008

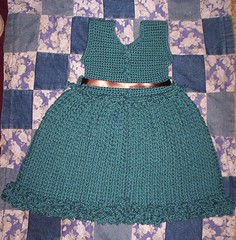
The Gabi baby dress...


000_0677
Originally uploaded by tangledskeins
Written for size 12mos.
Size F crochet hook for dress, D for buttons
Sport weight yarn (example used knit Picks Shine Sport 60% Pima Cotton, 40% Modal® natural beech wood fiber...chosen because it is super soft and does not shrink)
Gauge aprox. 5 sts and 5 rows per inch in sc.
Pattern is worked bottom up

Skirt
Chain 156
Join in a loop being careful not to twist the chain.

1 ch2 (count as first dc) dc in each chain around and join with a slst at the top of ch2

2 slip stitch around ch2 (count as fpdc (front post double crochet), ch2, dc in back loops of next 2 dc, (fpdc next dc, dc in back loops of next 2 dc) repeat around and join to the top of ch2.

3 Repeat line #2 for 10 inches.

4 slip stitch around ch2, ch1, sc decrease next 2 sts together through back loops only, (fpsc (front post single crochet) , sc decrease next 2 sts together through back loops only), repeat around, and join with a slst at the ch1

5 ch1, turn, sc in same and next 3 sts, (decrease next 2 sts together. Sc in next 4 sc’s), repeat around and join with a slst in the top of first sc.

Yoke
6 ch1 turn, sc in each st around

7 Repeat line #6 times 12

Left back panel
8 ch1, turn, work 17 scs

9 ch1, turn, decrease next 2 sts together, work sc across

10 Ch1, turn, sc across 16

11 Repeat lines 9 & 10 twice more (you should end up with 14 scs)

12 Ch1, turn, sc 13

13 Ch1 turn, decrease next 2 sts together, sc 11

14 Ch1 turn, sc 11

15 Ch1 turn decrease next 2 sts together, sc 9

16 Ch1 turn, sc 9

17 Ch1 turn, decrease next 2 sts together, sc 7

18 Ch1 turn sc 8

19 Repeat line #18 times 4 and bind off

Back Right panel
20 With right side facing. Join yarn with a slip stitch in the 17th st from edge and work 17 sc’s

21 Ch1 turn work 15 scs, decrease next 2 sts together
22 Ch1 turn sc across 16

23 Repeat lines #21 and #22 twice more

24 Ch1 turn sc 13 decrease next 2 sts together

25 Ch1 turn decrease next 2 sts together, sc across 11

26 Ch1 turn sc 11

27 Ch1 turn decrease next 2 sts together, sc across 9

28 Ch1 turn sc9

29 Ch1 turn decrease next 2 sts together, sc across 7

30 Ch1 turn sc 8

31 Repeat row #29 times 4 and bind off

Front Panel
32 with right side facing, join yarn with a slip stitch in the 3rd ch from back left panel, sc across, leaving 2 free stitches before the back right panel.

33 Ch 1 turn, decrease next 2 sts together, sc across to last 2, decrease next 2 sts together

34 Ch1 turn, sc across

35 Repeat line #33

Front right shoulder
36 ch1 turn sc 10

37 Ch1 turn decrease next 2 sts together, sc across

38 Ch1 turn sc 9

39 Ch1 turn decrease next 2 sts together, sc across

40 Ch1 turn sc 8

41 Repeat row #36 times 5 bind off

Front left shoulder
42 skip 4 stitches from right front shoulder panel and join with a slip stitch. Ch1, sc in same st and in next 9

43 ch1 turn sc 8, decrease next 2 sts together

44 Ch1 turn sc across

45 Ch1 turn sc 7 decrease next 2 sts together

46 Ch1 turn sc 8

47 Repeat row #42 times 5 bind off

Seam shoulders with whip stitch and secure, weave in ends

Yoke trim
48 with right side facing and beginning at the side of back left, join with a slip stitch and work sc’s evenly along back left and neck opening. On right back, work sc ch4, work 5scs, ch4, work 5scs, ch4 work 5scs, ch4, sc remainder of right back , join with a slst to first sc on back left. Bind off and weave in end.

Sleeve trim
49 With right side facing, join with a slip st at armpit, ch1, work sc evenly around opening and join with a slst in first sc

50 Ch1 sc around, join with a slst in first sc

51 Ch1 work reverse sc around and join, bind off, weave in end.

Repeat for other side.
52a Simple skirting edge, working in free loops at the bottom edge of the skirt, join yarn with a slip stitch at the back, ch1, sc in same st and in each st around.

53a Ch1 work reverse single crochet around and join, bind off, weave in end.


Optional waist and bottom ruffles

52b For waist, join yarn with a slip stitch in free loops at the waist. Ch1, Sc evenly around, and join with a slst in the first sc.

53b Ch1 turn, sc ch1 in each st around and join with a slst in the first sc.

54b Ch1 turn sc in ch1 space, ch3 (sc in next ch1 space, ch3) repeat around and join with a slst in first sc

55b Ch1 (work 2 sc in ch3 space, ch3, work 2 more sc in ch 3 space) repeat around and join with a slst in first sc. Bind off…

For bottom repeat as above for first ruffle, sc’ing in the back loops only for round 49b
For second bottom ruffle if you desire, join yarn with a slip stitch at the back, working in the free loops of round 52b left from the first ruffle and repeat rows 52b through 55b. Bind off, weave in all ends.

Buttons…make 4 using D hook
Leaving a long tail, chain 2 and work 5 scs in first ch…do not join round, but continue to sc around for 5 more stitches…bind off…using tapestry needle whip around through both loops of each se, stuff the long cast on tail inside, and pull closed. Make a stitch through the opposite side of the ‘drawstring’ to fully secure and sew the button in place firmly. Weave in end and repeat

back view showing buttons...

© 2008-by Amy O’Holleran: This is my original work, and may not be reproduced for sale without my express permission.


Pin It

Friday, October 31, 2008

Little Fire Crochet Soaker Updated!!

I have updated my Little Fire Crochet Soaker pattern, adjusted a few of the figures, and added figures for XL. I have also added instructions for 3 versions of skirty!!
You can find the updated pattern here. Pin It

Tuesday, October 21, 2008

Little Fire Crochet Pants

At long last it is done!! I have finally (with a little beta testing help from my friends at the wool soaker group)finished the Little Fire Crochet Pants! This pattern is written in four sizes (and I plan on adding XL to the original Little Fire Crochet Soaker pattern as well) Soooo...without further ado, here it is....

(I have had a few people mention that they were having trouble getting the waistbands of the Little Fire wooly patterns loose enough to have enough stretch, even when using a larger hook for the foundation. I have found the answer...the no-chain foundation!! If you go here No Chain and scroll down to the bottom of the page, you will find pictorial instructions for doing the No Chain Double Crochet. Work this technique to length (one less dc than the number of dc's called for in the pattern) in place of the foundation chain and first row of dc in both Little Fire Patterns.
I tried it out myself on the Pirate shorties I made for my son (incorporating a little stranding for a bit of fun) and it worked out fabulously. There is a small V at the join when following this technique, but it is easily stitched closed with the tail. The resulting stretchy waistband top is wonderful!)


Little Fire Soaker Pants

This pattern is worked with worsted weight wool yarn
Hook size G, Gauge 4 stitches per inch, 4 rows per inch in sc, or whatever hook you need to maintain gauge.
All Sizing is Approximate:
SMALL= WEIGHT 11-17 lbs WAIST 12-20 in. THIGHS 7-12 in. RISE 15-16 in. INSEAM 7 in.
MEDIUM= WEIGHT 15-22 lbs WAIST 12.5-20 in. THIGHS 8-13 in. RISE 17-18in. INSEAM 9 in.
LARGE= WEIGHT 20-26 lbs WAIST 13-22 in. THIGHS 9-14 in. RISE 19-20 in. INSEAM 11 in.
X-LARGE= WEIGHT 24-30 lbs WAIST 14-24 in. THIGHS 9-15 in. RISE 21-22 in. INSEAM 13 in.

Chain 56 loosely (64, 72, 80) Join in a loop with a slip stitch, being sure not to twist the chain

Row 1 CH 2 (count as first DC) DC in each SC around , join with a SLST in the top of the CH 2

Row 2-3 SLST around CH 2 of row 1, CH 2, *BPDC around next st, FPDC around next st* repeat around and join with a SLST in the top of the Ch 2. (Bind off if you plan on using a different color for the body of the soaker, otherwise continue on to Row 4.)

Row 4 (If starting a new color, join with a SLST in the first DC) CH 1, SC in same st, and in next 2 sts, 2 SC in next st, *SC in next 3 sts , 2 SC in next st*, repeat *-*{14(16, 18, 20) increases} around for a total of 70(80, 90, 100)

Row 5 Ch1, turn, SC in each stitch around, join with slip stitch in first SC. 70(80, 90, 100)

Row 6-8 Repeat row 5

Row 9 CH1, turn, SC in first 2(3, 4, 5) st, HDC in next 4(5, 6, 7) sts , DC in in next 23(24, 25, 26) sts, HDC in next 4(5, 6, 7) sts, SC in remaining 37 (43, 49, 55) sts, join with SLST to first SC.

Row 10-25 Repeat Rows 6-9 4 times for small, 5 times for medium, 6 times for large, and 7 times for extra-large. -70(80, 90, 100)scs

(For a longer rise, add additional repeat(s) of rows 6-9 here)

Row 26 repeat row 6 once more, bind off

Gusset
count over 20(24 ,27, 30) stitches from the beginning of round and join a new yarn with a SLST (working on the wrong side of the fabric)...ch1, sc in same and next 5(7, 9, 11) sts
*ch1, turn, sc 6(8, 10, 12) * rep 2 (4, 6, 8) times more, ...whipstitch to backside, making sure leg openings are equal…stitch count of 29(32, 35, 38) free stitches /per leg

Join yarn for leg in any st (I prefer to join at the inseam) sc around in each sc, and into each st at the gusset 35(40, 45, 50)scs NOTE* Be sure you a crocheting in the opposite direction from the previous row.

Row 27-54(62, 70, 78) CH1, turn work 35(40, 45, 50)SCs

###repeat 1/2 as many rounds for shorts###
***repeat 2/3 as many rounds for Capris***
+++option do a sc, 2sc pattern around for flared cuff+++

Bind off. Repeat for other leg, weave in ends, trim, Voila!
You can add your favorite style of drawstring at the waist if you desire.

Pattern updated 12/3/08
© 2008-by Amy O’Holleran: This is my original work, and may not be reproduced for sale without my express permission.

This pair of Little Fire pants was done by yahoo wool soaker group member Becky :) Thanks to her for the use of these pics ;)


Photobucket
Pin It

Tuesday, October 14, 2008

Taken the Etsy plunge...

So many people have told me over the years that I should sell my stuff...well, I'm finally doing it. A week ago last Friday I officially opened an Etsy. It took me months to get up the guts and just DO it already. So far so good...I'm starting to get the sort of assortment of stock (and crafting options) that interest me...I don't want to be stuck doing one sort of thing and end up being BORED out of my skull, LOL. My linky is Tangled Skeins So the name is no surprise, LOL...it fits me on so many levels ;) I have installed the mini Etsy widget here at WaTS...it is on the left side if you scroll down a bit. It just gives you a few examples of what I have in stock. At the moment I have several super soft Minkee pocket bibs, travel sized wet bags, fashion scarves, a hat, a fulled bag, and a Waldorf inspired rag doll. I have quite a few other things in the works, including some more hats, gauntlets, wool diaper soakers, and stuffed toys. Please keep me in mind when you are looking for items hand made with a lot of love. Pin It