Tuesday, December 9, 2008

Little Legs...


000_0526
Originally uploaded by tangledskeins
crochet baby (to about age 6) legwarmers {or armwarmers for age 6+}

Little Legs:

Yarn, sport weight
Size F hook
No actual gauge.

Ch40, join in a ring being careful not to twist the chain.

Cuff:
R1 Ch2, dc in next chain and in each around, join

R2 Slst around ch2, ch2 (count as fpdc), work bpdc around next dc, (work fpdc around next dc, work bpdc around next dc)repeat around, join w/slst in ch2

R3 Repeat previous row twice more OO

Body:
R4 Ch2, dc in next st and in each st around , join w/slst in ch2

R5 Repeat previous row 19 times more OOOOOOOOOOOOOOOOOOO

R6 Ch2, decrease next 2 sts together, work dc in each st around to last 2, decrease next 2 sts together, join w/slst in ch2

R7 Repeat previous row 3 times more OOO

Cuff:
R8 Ch2, dc in each st around, join w/slst in ch2

R9 Slst around ch2, ch2 (count as fpdc), work bpdc around next dc, (work fpdc around next dc, work bpdc around next dc)repeat around, join w/slst in ch2

R10 Repeat previous row twice more. OO
Bind off and weave in ends.

Note:
For stripes, I have found that I prefer to have 3 round stripes in the body…single rounds either left a LOT of tails to weave in when cut, or not as much stretch when carried


For the cream baby headband pictured above:
CH 70 (add length by 2's for a larger headband) and join in a loop, being careful not to twist the chain.
R1 ch 2 (count as first dc) and dc in each ch around, join with a slst in the top of ch2.
R2 slst around ch2, ch2, work bpdc around next dc, work fpdc around next dc, work bpdc around next dc), continue around, and join with a sl st in the top of ch 2.
R3+ Repeat round 2 for desired width, bind off, weave in ends. Decorate as desired. The example is decorated with a 6 petaled freeform flower and a shank button.


000_0689 *example features a baby newsboy hat...this pattern will be added later :) Pin It

Wednesday, December 3, 2008

UPDATE: Correction in Little Fire Pants pattern

I have made a correction to the Little Fire Pants pattern (link in list at left of screen). Thanks again to my wool soaker group mamas...you ladies rock! If you have printed out the pattern already, please print out the updated version. There was an error in the large and extra large sizes that required a rewrite of the short row section. I apologize for any inconveniences...happy crocheting!! Pin It

Thursday, November 20, 2008

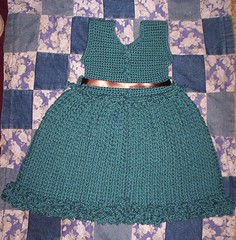
The Gabi baby dress...


000_0677
Originally uploaded by tangledskeins
Written for size 12mos.
Size F crochet hook for dress, D for buttons
Sport weight yarn (example used knit Picks Shine Sport 60% Pima Cotton, 40% Modal® natural beech wood fiber...chosen because it is super soft and does not shrink)
Gauge aprox. 5 sts and 5 rows per inch in sc.
Pattern is worked bottom up

Skirt
Chain 156
Join in a loop being careful not to twist the chain.

1 ch2 (count as first dc) dc in each chain around and join with a slst at the top of ch2

2 slip stitch around ch2 (count as fpdc (front post double crochet), ch2, dc in back loops of next 2 dc, (fpdc next dc, dc in back loops of next 2 dc) repeat around and join to the top of ch2.

3 Repeat line #2 for 10 inches.

4 slip stitch around ch2, ch1, sc decrease next 2 sts together through back loops only, (fpsc (front post single crochet) , sc decrease next 2 sts together through back loops only), repeat around, and join with a slst at the ch1

5 ch1, turn, sc in same and next 3 sts, (decrease next 2 sts together. Sc in next 4 sc’s), repeat around and join with a slst in the top of first sc.

Yoke
6 ch1 turn, sc in each st around

7 Repeat line #6 times 12

Left back panel
8 ch1, turn, work 17 scs

9 ch1, turn, decrease next 2 sts together, work sc across

10 Ch1, turn, sc across 16

11 Repeat lines 9 & 10 twice more (you should end up with 14 scs)

12 Ch1, turn, sc 13

13 Ch1 turn, decrease next 2 sts together, sc 11

14 Ch1 turn, sc 11

15 Ch1 turn decrease next 2 sts together, sc 9

16 Ch1 turn, sc 9

17 Ch1 turn, decrease next 2 sts together, sc 7

18 Ch1 turn sc 8

19 Repeat line #18 times 4 and bind off

Back Right panel
20 With right side facing. Join yarn with a slip stitch in the 17th st from edge and work 17 sc’s

21 Ch1 turn work 15 scs, decrease next 2 sts together
22 Ch1 turn sc across 16

23 Repeat lines #21 and #22 twice more

24 Ch1 turn sc 13 decrease next 2 sts together

25 Ch1 turn decrease next 2 sts together, sc across 11

26 Ch1 turn sc 11

27 Ch1 turn decrease next 2 sts together, sc across 9

28 Ch1 turn sc9

29 Ch1 turn decrease next 2 sts together, sc across 7

30 Ch1 turn sc 8

31 Repeat row #29 times 4 and bind off

Front Panel
32 with right side facing, join yarn with a slip stitch in the 3rd ch from back left panel, sc across, leaving 2 free stitches before the back right panel.

33 Ch 1 turn, decrease next 2 sts together, sc across to last 2, decrease next 2 sts together

34 Ch1 turn, sc across

35 Repeat line #33

Front right shoulder
36 ch1 turn sc 10

37 Ch1 turn decrease next 2 sts together, sc across

38 Ch1 turn sc 9

39 Ch1 turn decrease next 2 sts together, sc across

40 Ch1 turn sc 8

41 Repeat row #36 times 5 bind off

Front left shoulder
42 skip 4 stitches from right front shoulder panel and join with a slip stitch. Ch1, sc in same st and in next 9

43 ch1 turn sc 8, decrease next 2 sts together

44 Ch1 turn sc across

45 Ch1 turn sc 7 decrease next 2 sts together

46 Ch1 turn sc 8

47 Repeat row #42 times 5 bind off

Seam shoulders with whip stitch and secure, weave in ends

Yoke trim
48 with right side facing and beginning at the side of back left, join with a slip stitch and work sc’s evenly along back left and neck opening. On right back, work sc ch4, work 5scs, ch4, work 5scs, ch4 work 5scs, ch4, sc remainder of right back , join with a slst to first sc on back left. Bind off and weave in end.

Sleeve trim
49 With right side facing, join with a slip st at armpit, ch1, work sc evenly around opening and join with a slst in first sc

50 Ch1 sc around, join with a slst in first sc

51 Ch1 work reverse sc around and join, bind off, weave in end.

Repeat for other side.
52a Simple skirting edge, working in free loops at the bottom edge of the skirt, join yarn with a slip stitch at the back, ch1, sc in same st and in each st around.

53a Ch1 work reverse single crochet around and join, bind off, weave in end.


Optional waist and bottom ruffles

52b For waist, join yarn with a slip stitch in free loops at the waist. Ch1, Sc evenly around, and join with a slst in the first sc.

53b Ch1 turn, sc ch1 in each st around and join with a slst in the first sc.

54b Ch1 turn sc in ch1 space, ch3 (sc in next ch1 space, ch3) repeat around and join with a slst in first sc

55b Ch1 (work 2 sc in ch3 space, ch3, work 2 more sc in ch 3 space) repeat around and join with a slst in first sc. Bind off…

For bottom repeat as above for first ruffle, sc’ing in the back loops only for round 49b
For second bottom ruffle if you desire, join yarn with a slip stitch at the back, working in the free loops of round 52b left from the first ruffle and repeat rows 52b through 55b. Bind off, weave in all ends.

Buttons…make 4 using D hook
Leaving a long tail, chain 2 and work 5 scs in first ch…do not join round, but continue to sc around for 5 more stitches…bind off…using tapestry needle whip around through both loops of each se, stuff the long cast on tail inside, and pull closed. Make a stitch through the opposite side of the ‘drawstring’ to fully secure and sew the button in place firmly. Weave in end and repeat

back view showing buttons...

© 2008-by Amy O’Holleran: This is my original work, and may not be reproduced for sale without my express permission.


Pin It

Friday, October 31, 2008

Little Fire Crochet Soaker Updated!!

I have updated my Little Fire Crochet Soaker pattern, adjusted a few of the figures, and added figures for XL. I have also added instructions for 3 versions of skirty!!
You can find the updated pattern here. Pin It

Tuesday, October 21, 2008

Little Fire Crochet Pants

At long last it is done!! I have finally (with a little beta testing help from my friends at the wool soaker group)finished the Little Fire Crochet Pants! This pattern is written in four sizes (and I plan on adding XL to the original Little Fire Crochet Soaker pattern as well) Soooo...without further ado, here it is....

(I have had a few people mention that they were having trouble getting the waistbands of the Little Fire wooly patterns loose enough to have enough stretch, even when using a larger hook for the foundation. I have found the answer...the no-chain foundation!! If you go here No Chain and scroll down to the bottom of the page, you will find pictorial instructions for doing the No Chain Double Crochet. Work this technique to length (one less dc than the number of dc's called for in the pattern) in place of the foundation chain and first row of dc in both Little Fire Patterns.
I tried it out myself on the Pirate shorties I made for my son (incorporating a little stranding for a bit of fun) and it worked out fabulously. There is a small V at the join when following this technique, but it is easily stitched closed with the tail. The resulting stretchy waistband top is wonderful!)


Little Fire Soaker Pants

This pattern is worked with worsted weight wool yarn
Hook size G, Gauge 4 stitches per inch, 4 rows per inch in sc, or whatever hook you need to maintain gauge.
All Sizing is Approximate:
SMALL= WEIGHT 11-17 lbs WAIST 12-20 in. THIGHS 7-12 in. RISE 15-16 in. INSEAM 7 in.
MEDIUM= WEIGHT 15-22 lbs WAIST 12.5-20 in. THIGHS 8-13 in. RISE 17-18in. INSEAM 9 in.
LARGE= WEIGHT 20-26 lbs WAIST 13-22 in. THIGHS 9-14 in. RISE 19-20 in. INSEAM 11 in.
X-LARGE= WEIGHT 24-30 lbs WAIST 14-24 in. THIGHS 9-15 in. RISE 21-22 in. INSEAM 13 in.

Chain 56 loosely (64, 72, 80) Join in a loop with a slip stitch, being sure not to twist the chain

Row 1 CH 2 (count as first DC) DC in each SC around , join with a SLST in the top of the CH 2

Row 2-3 SLST around CH 2 of row 1, CH 2, *BPDC around next st, FPDC around next st* repeat around and join with a SLST in the top of the Ch 2. (Bind off if you plan on using a different color for the body of the soaker, otherwise continue on to Row 4.)

Row 4 (If starting a new color, join with a SLST in the first DC) CH 1, SC in same st, and in next 2 sts, 2 SC in next st, *SC in next 3 sts , 2 SC in next st*, repeat *-*{14(16, 18, 20) increases} around for a total of 70(80, 90, 100)

Row 5 Ch1, turn, SC in each stitch around, join with slip stitch in first SC. 70(80, 90, 100)

Row 6-8 Repeat row 5

Row 9 CH1, turn, SC in first 2(3, 4, 5) st, HDC in next 4(5, 6, 7) sts , DC in in next 23(24, 25, 26) sts, HDC in next 4(5, 6, 7) sts, SC in remaining 37 (43, 49, 55) sts, join with SLST to first SC.

Row 10-25 Repeat Rows 6-9 4 times for small, 5 times for medium, 6 times for large, and 7 times for extra-large. -70(80, 90, 100)scs

(For a longer rise, add additional repeat(s) of rows 6-9 here)

Row 26 repeat row 6 once more, bind off

Gusset
count over 20(24 ,27, 30) stitches from the beginning of round and join a new yarn with a SLST (working on the wrong side of the fabric)...ch1, sc in same and next 5(7, 9, 11) sts
*ch1, turn, sc 6(8, 10, 12) * rep 2 (4, 6, 8) times more, ...whipstitch to backside, making sure leg openings are equal…stitch count of 29(32, 35, 38) free stitches /per leg

Join yarn for leg in any st (I prefer to join at the inseam) sc around in each sc, and into each st at the gusset 35(40, 45, 50)scs NOTE* Be sure you a crocheting in the opposite direction from the previous row.

Row 27-54(62, 70, 78) CH1, turn work 35(40, 45, 50)SCs

###repeat 1/2 as many rounds for shorts###
***repeat 2/3 as many rounds for Capris***
+++option do a sc, 2sc pattern around for flared cuff+++

Bind off. Repeat for other leg, weave in ends, trim, Voila!
You can add your favorite style of drawstring at the waist if you desire.

Pattern updated 12/3/08
© 2008-by Amy O’Holleran: This is my original work, and may not be reproduced for sale without my express permission.

This pair of Little Fire pants was done by yahoo wool soaker group member Becky :) Thanks to her for the use of these pics ;)


Photobucket
Pin It

Tuesday, October 14, 2008

Taken the Etsy plunge...

So many people have told me over the years that I should sell my stuff...well, I'm finally doing it. A week ago last Friday I officially opened an Etsy. It took me months to get up the guts and just DO it already. So far so good...I'm starting to get the sort of assortment of stock (and crafting options) that interest me...I don't want to be stuck doing one sort of thing and end up being BORED out of my skull, LOL. My linky is Tangled Skeins So the name is no surprise, LOL...it fits me on so many levels ;) I have installed the mini Etsy widget here at WaTS...it is on the left side if you scroll down a bit. It just gives you a few examples of what I have in stock. At the moment I have several super soft Minkee pocket bibs, travel sized wet bags, fashion scarves, a hat, a fulled bag, and a Waldorf inspired rag doll. I have quite a few other things in the works, including some more hats, gauntlets, wool diaper soakers, and stuffed toys. Please keep me in mind when you are looking for items hand made with a lot of love. Pin It

Friday, September 19, 2008

Solareveil Ring Sling


solarveilring
Originally uploaded by tangledskeins
I was ecstatic today to receive my long awaited solareveil. Thanks very much to Stacey at Bella Junction! This amazing fabric is super lightweight, and fast drying, making it ideal for the pool, beach, or shower. Top that off with amazing sun protection properties...it blocks out 70/80 % of UVA and UVB rays with a single layer, and 90/95% with a double layer. Makes you really wonder why the company doesn't manufacture it anymore. Here's hoping they change their minds! With an ever dwindling supply available, I can't even express how glad I am to finally get my hands on some, LOL. No sooner was the fabric out of the box than I set to making a couple of rings slings. I decided to make two single layer slings, and gift one to my SIL for her to use with my little nephew. I made the tail into a little sun hood, rather than just leaving it loose or tapering the end. I found the fabric very easy to work with, and I am looking forward to testing it out at my nearly-niece's bithday party at the lake next weekend.
Pin It

Wednesday, September 17, 2008

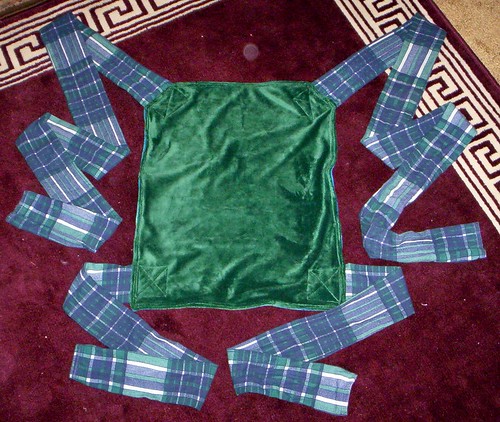
MMMM Minkee Mei Tei!

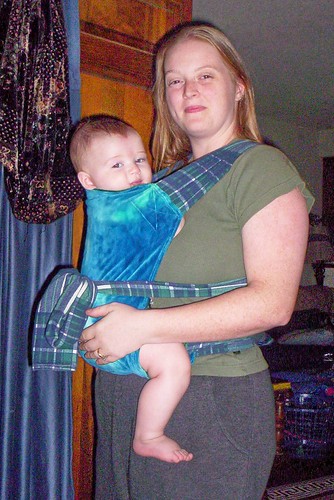
I made myself a new Mei Tei today, as I intend to gift the denim one (pic here) I made a few months back to my SIL. This one is reversable, with 2 layers of ultra yummy Minkee...Green on one side, and Aqua on the other. It is sooo cozy. DS was rubbing his cheeks on it and grinning when we tried it on earlier :) Too sweet. I eliminated the rounded top, as that is one part of the previous pattern that I failed to see the need for. Instead I cut the top corners off at a 45 degree angle, and just left the top straight.


ETA...an action shot was requested...so bumbumdebum...

Pin It

Tuesday, September 2, 2008

"Black Apple" Ballerina dolly

Mady's little friend (another Madison) had a birthday this weekend. Since my budget is still rebounding from the hit it took for back to school last month, I couldn't really afford to buy anything new. A couple days earier I had seen an episode of Martha Stewart where they made some really cute dolls. http://www.marthastewart.com/article/black-apple-doll I didn't exactly follow the pattern...it calls for you to blow up the pattern 150%, but I just wanted to make a cute little doll, not a big one. I kept the pattern as printed, added a circle skirt tutu, drew on some slippers, sewed on some ribbons and beads, and drew on a little face. Mady was thrilled with it.
Pin It

Tuesday, August 19, 2008

'Just a Tam Minute' Hat

It's finally done! I really love how this pattern turned out, and can't wait to make more. I ran out of the black crochet cotton I was using for the body of the hat, so I switched to a remanent of tweed thread I had sitting in the bottom of my yarn bin. (I scored 5 skeins of the stuff YEARS ago at a yard sale, and am down now to the tiniest little bit!)

The 'Just a Tam Minute' Hat:

Size 10 crochet cotton
1 / 2.75mm hook

Ch4 and join in a loop

R1 Ch1, work 11 sc into the loop and join with a slip stitch in the ch1

R2 Ch2, dc in same st, 2 dc in next st and in each st around, join with a slip stitch in the ch2

R3 Ch2, dc in same dc, dc in next dc, *2dc in next dc, dc in next dc* Repeat around and join with a slip stitch in the ch2

R4 Ch2, dc in same dc, dc in next 2 dc, *2dc in next dc, dc in next 2 dc* Repeat around and join with a slip stitch in the ch2

R5 Ch2, dc in same dc, dc in next dc, ch1, skip 1 dc and dc in the next dc, * 2dc in next dc, dc in next dc, ch1, skip 1 dc and dc in next dc* Repeat around and join with a slip stitch in the ch2

R6 Ch2, dc in same dc, dc in next 2 dc, dc in ch1 space, dc in next dc *2dc in next dc, dc in next 2 dc, dc in ch1 space, dc in next dc* Repeat around and join with a slip stitch in the ch2

R7 Ch2, dc in same dc, dc in next dc, (ch1, skip 1 dc and dc in the next dc)twice, *2dc in next dc, dc in next dc, (ch1, skip 1 dc and dc in the next dc)twice* Repeat around and join with a slip stitch in the ch2

R8 Ch2, dc in same dc, dc in next 2 dc, (dc in ch1 space, dc in next dc )twice, *2dc in next dc, dc in next 2 dc, (dc in ch1 space, dc in next dc)twice* Repeat around and join with a slip stitch in the ch2

R9 Ch2, dc in same dc, dc in next dc, (ch1, skip 1 dc and dc in the next dc)3 times, *2dc in next dc, dc in next dc, (ch1, skip 1 dc and dc in the next dc)3 times* Repeat around and join with a slip stitch in the ch2

R10 Ch2, dc in same dc, dc in next 2 dc, (dc in ch1 space, dc in next dc )3 times, *2dc in next dc, dc in next 2 dc, (dc in ch1 space, dc in next dc)3 times* Repeat around and join with a slip stitch in the ch2

R11 Ch2, dc in same dc, dc in next dc, (ch1, skip 1 dc and dc in the next dc)4 times, *2dc in next dc, dc in next dc, (ch1, skip 1 dc and dc in the next dc)4 times* Repeat around and join with a slip stitch in the ch2

R12 Ch2, dc in same dc, dc in next 2 dc, (dc in ch1 space, dc in next dc )4 times, *2dc in next dc, dc in next 2 dc, (dc in ch1 space, dc in next dc)3 times* Repeat around and join with a slip stitch in the ch2

R13 Ch2, dc in same dc, dc in next dc, (ch1, skip 1 dc and dc in the next dc)5 times, *2dc in next dc, dc in next dc, (ch1, skip 1 dc and dc in the next dc)5 times* Repeat around and join with a slip stitch in the ch2

R14 Ch2, dc in same dc, dc in next 2 dc, (dc in ch1 space, dc in next dc )5 times, *2dc in next dc, dc in next 2 dc, (dc in ch1 space, dc in next dc)5 times* Repeat around and join with a slip stitch in the ch2

R15 Ch2, dc in same dc, dc in next dc, (ch1, skip 1 dc and dc in the next dc)6 times, *2dc in next dc, dc in next dc, (ch1, skip 1 dc and dc in the next dc)6 times* Repeat around and join with a slip stitch in the ch2


R16 Ch2, dc in same dc, dc in next 2 dc, (dc in ch1 space, dc in next dc )6 times, *2dc in next dc, dc in next 2 dc, (dc in ch1 space, dc in next dc)6 times* Repeat around and join with a slip stitch in the ch2

R17 Ch2, dc in same dc, dc in next dc, (ch1, skip 1 dc and dc in the next dc)7 times, *2dc in next dc, dc in next dc, (ch1, skip 1 dc and dc in the next dc)7 times* Repeat around and join with a slip stitch in the ch2

R18 Ch2, dc in same dc, dc in next 2 dc, (dc in ch1 space, dc in next dc )7 times, *2dc in next dc, dc in next 2 dc, (dc in ch1 space, dc in next dc)7 times* Repeat around and join with a slip stitch in the ch2

R19 Ch2, dc in same dc, dc in next dc, (ch1, skip 1 dc and dc in the next dc)8 times, *2dc in next dc, dc in next dc, (ch1, skip 1 dc and dc in the next dc)8 times* Repeat around and join with a slip stitch in the ch2

R20 Ch2, dc in same dc, dc in next 2 dc, (dc in ch1 space, dc in next dc )8 times, *2dc in next dc, dc in next 2 dc, (dc in ch1 space, dc in next dc)8 times* Repeat around and join with a slip stitch in the ch2

R21 Ch3, skip 1 dc, dc in next dc *ch1 skip 1 dc and dc in the next dc* Repeat around and join with a slip stitch in the second ch of the initial ch3.

R22 Ch2 *dc in the ch 1 space, and in the next dc* Repeat around and join with a slip stitch in the ch2

R23 Ch3, skip 1 dc, dc in next dc *ch1 skip 1 dc and dc in the next dc* Repeat around and join with a slip stitch in the second ch of the initial ch3.

R24 Ch2, dc decrease the next 2 stitches together {yo, insert hook into ch 1 space, yo and draw up a loop, insert hook into dc, yo and draw up a loop, yo and draw through 3 loops on hook, yo and draw through remaining 2}, (dc in next ch 1 space, dc in next dc)9 times (18 dc’s), *work decrease, (dc in next ch 1 space, dc in next dc)9 times* Repeat **9 times, work decrease, (dc in next ch 1 space, dc in next dc)8 times, dc in next ch 1 space and join with a slip stitch in the ch2

R25 Ch2, *decrease next 2 dc’s together, dc in next dc (ch1, skip 1 dc and dc in the next)8 times* Repeat ** 10 times, decrease next 2 dc’s together, dc in next dc (ch1, skip 1 dc and dc in the next)7 times, ch1, and join with a slip stitch in the ch2

R26 Ch2, *decrease the next 2 dc’s together, (dc in next ch 1 space, dc in next dc)8 times (16 dc’s)*, Repeat ** 10 times, decrease the next 2 dc’s together, (dc in next ch 1 space, dc in next dc)7 times, dc in next ch 1 space and join with a slip stitch in the ch2

R27 Ch2, *decrease next 2 dc’s together, dc in next dc (ch1, skip 1 dc and dc in the next)7 times* Repeat ** 10 times, decrease next 2 dc’s together, dc in next dc (ch1, skip 1 dc and dc in the next)6 times, ch1, and join with a slip stitch in the ch2

R28 Ch2, *decrease the next 2 dc’s together, (dc in next ch 1 space, dc in next dc)7 times (16 dc’s)*, Repeat ** 10 times, decrease the next 2 dc’s together, (dc in next ch 1 space, dc in next dc)6 times, dc in next ch 1 space and join with a slip stitch in the ch2

R29 Ch2, *decrease next 2 dc’s together, dc in next dc (ch1, skip 1 dc and dc in the next)6 times* Repeat ** 10 times, decrease next 2 dc’s together, dc in next dc (ch1, skip 1 dc and dc in the next)5 times, ch1, and join with a slip stitch in the ch2

R30 Ch1, *sc decrease next 2 st together, , (sc in ch1 space, sc in dc)6 times* Repeat ** 10 times, sc decrease next 2 st together, , (sc in ch1 space, sc in dc)5 times, sc in ch1 space, and join with a slip stitch in the ch1
R31 Ch1, *decrease next 2 stitches together, sc in next 11 sc* 10 times, decrease next 2 stitches together, sc in next 10 sc, and join with a slip stitch in the initial ch1

R32 Ch1 *decrease next 2 stitches together, sc in next 10 sc* 10 times, decrease next 2 stitches together, sc in next 10 sc, and join with a slip stitch in the initial ch1

R33 Ch1 *decrease next 2 stitches together, sc in next 9 sc* 10 times, decrease next 2 stitches together, sc in next 8 sc, and join with a slip stitch in the initial ch1

R34-36 Ch1, sc in each sc around and join with a slip stitch in the initial ch1

Bind off, weave in ends, and voila!

Pin It