Yarn: Knit Picks Suri Dream ( 74% Suri Alpaca, 22% Peruvian Highland Wool, 4% Nylon) or a comparable yarn in 3 colors. Designate one as A, one as B, and one as C. Example uses Knit Picks Suri Dream in A:Gloxinia, B:Natural, and C:Aegean
US 11 and US 15 needles
Cast one 220 stitches on a US 15 needle (to maintain stretch) using long tail cast-on
knit onto US 11 (use until bind off)
knit in garter throughout in rows as follows:
2 rows in color A
4 rows in color B
4 rows in color C
4 rows in color A
4 rows in color C
4 rows in color B
3 rows in color A
bind off in color A using US 15
Pin It

. . . . . .Where all of the crafty chaos comes together!
Saturday, October 3, 2009


Friday, September 18, 2009
Amy's Wrap, Newborn
I finished reworking my wrap pattern for newborns last night (as requested on the Yahoo Wool Soaker Group)
Using the original pattern (Crochet Wrap)...sized down in this manner...
Foundation chain with F hook
Rows 1-3 worked with D hook, switching back to the F at the final Ch1
Rows 4-60 worked with F hook, switching back to the D at the final Ch2
Rows 61-63 and side finishing worked with the D hook.
Back waistband measures 13 inches
Front waistband measures 9 inches
Rise measures 13 inches
Crotch width measures 8 inches
(all measurements unstretched)
Friday, August 21, 2009
Little Fire Sleep Sack
Features the same roomy back as the other Little Fire patterns, as well as lots of legroom for kicking :D
Newborn up to approx.15lbs
This pattern is worked with worsted weight wool yarn. Uses approx. 385 yds (example uses Knit Picks Wool of the Andes in Williamsburg and Maple Syrup)
Hook size G, Gauge 4 stitches per inch, 4 rows per inch in sc, or whatever hook you need to maintain gauge.
R1 Cast 56 dc’s using the No Chain double crochet. (initial ch3 plus 55 dc’s), and join in a loop, being careful not to twist. For step by step instructions on how to do the No Chain foundation see: http://serendipity.gpvm.com/no_chain.html
R2-R6 SLST around the first st of round 1, ch2, *BPDC around next st, FPDC around next st* repeat around and join with a SLST in the top of the Ch 2. (Bind off if you plan on using a different color for the body of the soaker, otherwise continue on to R7.)
R7 (If starting a new color, join with a SLST in the first DC) CH 1, SC in same st, and in next 2 sts, 2 SC in next st, *SC in next 3 sts , 2 SC in next st*, repeat *-*{14 increases} around, join with a SLST in the first sc 70scs
R8 Ch1, turn, SC in each stitch around, join with SLST in first SC. 70scs
R9-R11 Repeat R8
R12 CH1, turn, SC in first 2sts, HDC in next 4sts , DC in in next 23sts, HDC in next 4sts, SC in remaining 37sts, join with SLST to first SC.
R13-R16 Repeat rounds 9 to 12
R17-R20 Repeat rounds 9 to 12
R21-R24 Repeat rounds 9 to 12
R25-R72 Repeat round 8 (until garment measure 16 inches, approx 47 repeats) {You might be tempted to speed this section along by using dc…don’t…this will make larger ‘holes’ that could be problematic for tiny toes ;)}
R73 Ch1, turn, sc in first 4 sts, ch1 skip 1 sc, *sc in next 4 sts, ch1 skip 1 sc* Repeat *-* around, join with a SLST in first sc.
R74 Ch1, turn, sc in each sc and ch1 space around. Join with a SLST in the first sc
R75-R76 Ch1, turn, sc around, join with a SLST in the first sc
R77 Ch1, turn, reverse sc around for finishing, join, bind off, weave in ends.
Stitch closed the small V at the ribbing using the leftover tail before weaving in your end.
Make 2 drawstrings…one for the top waistband, one for the foot closure. Weave the first through the top ribbing, and the second through the bottom eyelet row.
Wednesday, May 27, 2009
Teacher appreciation...
My daughter Mady had the best Kindergarten teacher this year. Truely a parent could not ask for more. Not only that, but she must have the patience of a saint! Her class was not the traditional half day Kindergarten, but a full day class. A full day with 20 6 year olds...like I said, the patience of a saint! Anyway, as a little thank you to her for such a wonderful year, Mady and I made her a little pretty...Mady picked which beads and closure we would use, and I put it together...I decorated the little box with some scrapbook elements just to make it a little more special. Thanks for a wonderful year Mrs. M...here is hoping she is still there in a year when it is Reilly's turn!

Pin It

Pin It
Monday, May 18, 2009
Stevie the Spermie

My friend Steph and her hubby Steve are trying for their 8th child. In honor of that momentous feat, I made up this little keychain buddy. (I've since had another friend inquire about a baby toy sized version, so keep an eye out!)
Head:
With worsted weight yarn and size 4 dpn's, cast on 6 stitches.
(example uses Knit Picks Wool of the Andes in cloud)
R1-k6 around
R2-*k1, m1, k1* around
R3-*k2, m1, k1* around
R4-*k3, m1, k1* around
R5-*k4, m1, k1* around
R6-*k5, m1, k1* around
R7 to R9-k around
R10-k2tog, k3, k2tog
R11-k2tog, k1, k2tog
R12-k2tog, k1, k2tog
*do not bind off
Stuff Stevie's head with a tiny bit of polyfill or yarn scraps before continuing with the tail.
Tail:
R12+-3 stitch-cord for one inch
k2tog, cont. 2 stitch I cord for 1/2 inch
k2tog, cont single stitch for 1/2 inch.
bind off, leave a long tail.
Embroider his little face on with a scrap of dark wool (I used KP WotA in coal)
I fulled this little guy a bit by hand so the stitch definition would be less, but it really isn't necessary. After he had dried, I trimmed the yarn tail to about a quarter inch, and added a cute heart keychain fob.
Wednesday, May 13, 2009
Gone Loopy Boa
I think this is going to be one of my favorite knit stitches yet...the loop stitch is so much fun! If you don't know how to do it, I have done a little video tut to help you out (with the help of my eldest daughter)
The pattern is very simple...
I'm using Lion brand Velvet Spun yarn in white, but I think this will work great with any plush yarn. I'm working it up on size 15 needles.
CO 3 stitches using the long tail cast on.
work 3 loop stitches as indicated in the video (knit first stitch, leave loop on left needle, pull working yarn through between worked stitch and remaining loop, catch over your thumb to make a large loop and bring back through the same space, knit loop on left needle, pass 1st knit stitch over, loop stitch created)
Continue knitting for length...I used 2 skeins of 54yds each for a nice long boa.


Pin It

The pattern is very simple...
I'm using Lion brand Velvet Spun yarn in white, but I think this will work great with any plush yarn. I'm working it up on size 15 needles.
CO 3 stitches using the long tail cast on.
work 3 loop stitches as indicated in the video (knit first stitch, leave loop on left needle, pull working yarn through between worked stitch and remaining loop, catch over your thumb to make a large loop and bring back through the same space, knit loop on left needle, pass 1st knit stitch over, loop stitch created)
Continue knitting for length...I used 2 skeins of 54yds each for a nice long boa.
Saturday, May 2, 2009
Let it stretch!! Little Fire patterns
I have had a few people mention that they were having trouble getting the waistbands of the Little Fire wooly patterns loose enough to have enough stretch, even when using a larger hook for the foundation. I have found the answer...the no-chain foundation!! If you go here No Chain and scroll down to the bottom of the page, you will find instructions for doing the No Chain Double Crochet. Work this technique to length (one less dc than the number of dc's called for in the pattern) in place of the foundation chain and first row of dc in both Little Fire Patterns.
I tried it out myself on the Pirate shorties I just made for my son (incorporating a little stranding for a bit of fun) and it worked out fabulously. There is a small V at the join when following this technique, but it is easily stitched closed with the tail. The resulting stretchy waistband top is wonderful!
 Pin It
I tried it out myself on the Pirate shorties I just made for my son (incorporating a little stranding for a bit of fun) and it worked out fabulously. There is a small V at the join when following this technique, but it is easily stitched closed with the tail. The resulting stretchy waistband top is wonderful!
Pin It
Monday, March 23, 2009
Simple eyelet-edged mitts
These patterns are for 2 lengths with the same basic design. The design is very simple, and is a great project for practicing with dpn's. They are also very fast to work up, for those that like instant gratification, LOL. Cute in solid colors, as well as verigated (which awesomely in the colors I have worked up, leads to a cute striped effect!) :)
For both versions, cast on 30 stitches on size 8 dpns, using your preferred cast on (I used the long-tail method)
Short version:


K1P1 rib for 15 rounds
K for 10 rounds
Bind off 8 stitches, continue knitting around
Cast on 8 stitches, continue knitting around
K 8 rounds
K2Tog y/o around
K 3 rounds
Bind off, Repeat for second mitt.
Long version:

K1P1 rib for 10 rounds
K for 30 rounds
Bind off 8 stitches, continue knitting around
Cast on 8 stitches, continue knitting around
K 8 rounds
K2Tog y/o around
K 3 rounds
Bind off, Repeat for second mitt.
*edit...forgot the y/o in the k2tog rounds...oops!
Pin It

For both versions, cast on 30 stitches on size 8 dpns, using your preferred cast on (I used the long-tail method)
Short version:
K1P1 rib for 15 rounds
K for 10 rounds
Bind off 8 stitches, continue knitting around
Cast on 8 stitches, continue knitting around
K 8 rounds
K2Tog y/o around
K 3 rounds
Bind off, Repeat for second mitt.
Long version:
K1P1 rib for 10 rounds
K for 30 rounds
Bind off 8 stitches, continue knitting around
Cast on 8 stitches, continue knitting around
K 8 rounds
K2Tog y/o around
K 3 rounds
Bind off, Repeat for second mitt.
*edit...forgot the y/o in the k2tog rounds...oops!
Thursday, March 5, 2009
Blanket of Rassilon...finished the seal!!
I finally finished the Seal of Rassilon motif on my Blanket of Rassilon! (see the other posts for how this project progressed;) I'm really glad I challenged myself with this one...doing crochet intarsia and teaching myself to carry colors so that the work is 'finished' on both sides...I do believe that I will be trying more projects like this in the future!
Pin It

Pin It
Friday, February 27, 2009
Cabled Mitts
Fingerless gloves are all the rage, it seems. My daughters can't seem to get enough pairs, and are always asking for more. I wanted to challenge myself a little bit, so this is a design I worked up after their latest request.
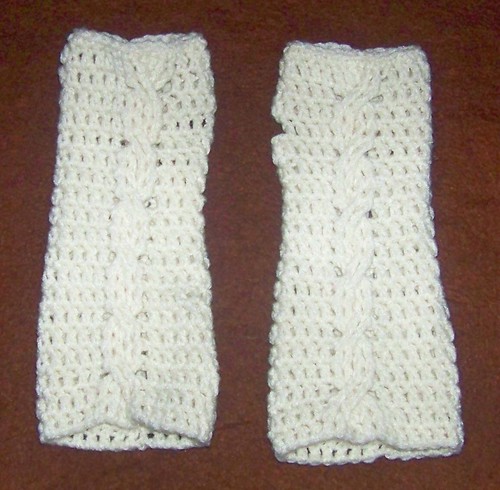
Cabled Mitts
Hook size G
Worsted weight yarn
Right Hand
Ch 30 join with a sl st being careful not to twist the chain
R1 Ch 2 (count as a dc now and throughout), dc in next ch and in each ch around , join with a sl st
R2 Ch 2, dc 11, fpdc (front post double chain) around next 2 dc, dc 2 , fpdc around next 2 dc, dc 12, join with a sl st
R3 Ch 2, dc 11, skip the next 4 sts, work fptrch (front post triple chain) around the next 2 sts,. Ch 2, Working behind the 2 previous stitches work 2 fptrch around the 2 skipped fpdc’s. Skip back to the other side of the cable twist, dc 12, join with a sl st
R4 Ch 2, dc 11, fpdc around next 2 sts, dc 2 in ch 2 space, fpdc around next 2 sts, dc 12, join with a sl st
R5 Ch 2, dc 11, fpdc around next 2 sts, dc 2, fpdc around next 2 sts, dc 12, join with a sl st
R6 Ch 2, dc 11, skip the next 4 sts, work fptrch around the next 2 sts,. Ch 2, Working behind the 2 previous stitches work 2 fptrch around the 2 skipped fpdc’s. Skip back to the other side of the cable twist, dc 12, join with a sl st
R7 Ch 2, dc 11, fpdc around next 2 sts, dc 2 in ch 2 space, fpdc around next 2 sts, dc 12, join with a sl st
R8 Ch 2, decrease next 2 sts together, dc 9, fpdc around next 2 sts, dc 2, fpdc around next 2 sts, dc 9, decrease next 2 sts together, dc in last dc, join with a sl st
R9 Ch 2, dc 10, skip the next 4 sts, work fptrch around the next 2 sts,. Ch 2, Working behind the 2 previous stitches work 2 fptrch around the 2 skipped fpdc’s. Skip back to the other side of the cable twist, dc 11, join with a sl st
R10 Ch 2, decrease next 2 sts together, dc 8, fpdc around next 2 sts, dc 2 in ch 2 space, fpdc around next 2 sts, dc 8, decrease next 2 sts together, dc in last dc, join with a sl st
R11 Ch 2, dc 9, fpdc around next 2 sts, dc 2, fpdc around next 2 sts, dc 10, join with a sl st
R12 Ch 2, dc 9, skip the next 4 sts, work fptrch around the next 2 sts,. Ch 2, Working behind the 2 previous stitches work 2 fptrch around the 2 skipped fpdc’s. Skip back to the other side of the cable twist, dc 10, join with a sl st
R13 Ch 2, dc 9, fpdc around next 2 sts, dc 2 in ch 2 space, fpdc around next 2 sts, dc 10, join with a sl st
R14 Ch 2, dc 9, fpdc around next 2 sts, dc 2, fpdc around next 2 sts, dc 10, join with a sl st
R15 Ch 2, dc 9, skip the next 4 sts, work fptrch around the next 2 sts,. Ch 2, Working behind the 2 previous stitches work 2 fptrch around the 2 skipped fpdc’s. Skip back to the other side of the cable twist, dc 4, (2dc in next st)twice, dc 4, join with a sl st
R16 Ch 2, dc 9, fpdc around next 2 sts, dc 2 in ch 2 space, fpdc around next 2 sts, dc 4, ch 4, dc 4, join with a sl st
R17 Ch 2, dc 9, fpdc around next 2 sts, dc 2, fpdc around next 2 sts, dc 4, dc 4 in ch 4 space, dc 4, join with a sl st
R18 Ch 2, dc 9, skip the next 4 sts, work fptrch around the next 2 sts,. Ch 2, Working behind the 2 previous stitches work 2 fptrch around the 2 skipped fpdc’s. Skip back to the other side of the cable twist, dc 4, (decrease next 2 sts together)twice, dc 4, join with a sl st
R19 Ch 2, dc 9, fpdc around next 2 sts, dc 2 in ch 2 space, fpdc around next 2 sts, dc 10, join with a sl st
R20 Ch1, work sc’s around, bind off and weave in ends.
Left Hand
Ch 30 join with a sl st being careful not to twist the chain
R1 Ch 2, dc in next ch and in each ch around , join with a sl st
R2 Ch 2, dc 11, fpdc (front post double crochet) around next 2 dc, dc 2 , fpdc around next 2 dc, dc 12, join with a sl st
R3 Ch 2, dc 11, skip the next 4 sts, work fptrch (front post triple chain) around the next 2 sts,. Ch 2, Working in front of the 2 previous stitches work 2 fptrch around the 2 skipped fpdc’s. Skip back to the other side of the cable twist, dc 12, join with a sl st
R4 Ch 2, dc 11, fpdc around next 2 sts, dc 2 in ch 2 space, fpdc around next 2 sts, dc 12, join with a sl st
R5 Ch 2, dc 11, fpdc around next 2 sts, dc 2, fpdc around next 2 sts, dc 12, join with a sl st
R6 Ch 2, dc 11, skip the next 4 sts, work fptrch around the next 2 sts,. Ch 2, Working in front of the 2 previous stitches work 2 fptrch around the 2 skipped fpdc’s. Skip back to the other side of the cable twist, dc 12, join with a sl st
R7 Ch 2, dc 11, fpdc around next 2 sts, dc 2 in ch 2 space, fpdc around next 2 sts, dc 12, join with a sl st
R8 Ch 2, decrease next 2 sts together, dc 9, fpdc around next 2 sts, dc 2, fpdc around next 2 sts, dc 9, decrease next 2 sts together, dc in last dc, join with a sl st
R9 Ch 2, dc 10, skip the next 4 sts, work fptrch around the next 2 sts,. Ch 2, Working in front of the 2 previous stitches work 2 fptrch around the 2 skipped fpdc’s. Skip back to the other side of the cable twist, dc 11, join with a sl st
R10 Ch 2, decrease next 2 sts together, dc 8, fpdc around next 2 sts, dc 2 in ch 2 space, fpdc around next 2 sts, dc 8, decrease next 2 sts together, dc in last dc, join with a sl st
R11 Ch 2, dc 9, fpdc around next 2 sts, dc 2, fpdc around next 2 sts, dc 10, join with a sl st
R12 Ch 2, dc 9, skip the next 4 sts, work fptrch around the next 2 sts,. Ch 2, Working in front of the 2 previous stitches work 2 fptrch around the 2 skipped fpdc’s. Skip back to the other side of the cable twist, dc 10, join with a sl st
R13 Ch 2, dc 9, fpdc around next 2 sts, dc 2 in ch 2 space, fpdc around next 2 sts, dc 10, join with a sl st
R14 Ch 2, dc 9, fpdc around next 2 sts, dc 2, fpdc around next 2 sts, dc 10, join with a sl st
R15 Ch 2, dc 3, (2dc in next st)twice, dc 4, skip the next 4 sts, work fptrch around the next 2 sts, Ch 2, Working in front of the 2 previous stitches work 2 fptrch around the 2 skipped fpdc’s. Skip back to the other side of the cable twist, dc 9, join with a sl st
R16 Ch 2, dc 3, ch 4, dc 4, fpdc around next 2 sts, dc 2 in ch 2 space, fpdc around next 2 sts, dc 9, join with a sl st
R17 Ch 2, dc 3, dc 4 in ch 4 space, dc 4,fpdc around next 2 sts, dc 2, fpdc around next 2 sts, dc 9, join with a sl st
R18 Ch 2, dc 9, skip the next 4 sts, work fptrch around the next 2 sts,. Ch 2, Working in front of the 2 previous stitches work 2 fptrch around the 2 skipped fpdc’s. Skip back to the other side of the cable twist, dc 4, (decrease next 2 sts together)twice, dc 4, join with a sl st
R19 Ch 2, dc 9, fpdc around next 2 sts, dc 2 in ch 2 space, fpdc around next 2 sts, dc 10, join with a sl st
R20 Ch1, work sc’s around, bind off and weave in ends.
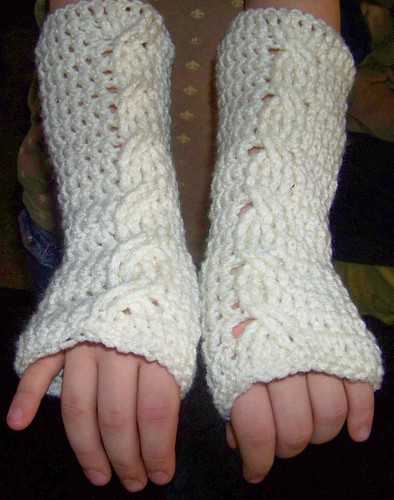

some suggested supplies for this projest:
Pin It
Cabled Mitts
Hook size G
Worsted weight yarn
Right Hand
Ch 30 join with a sl st being careful not to twist the chain
R1 Ch 2 (count as a dc now and throughout), dc in next ch and in each ch around , join with a sl st
R2 Ch 2, dc 11, fpdc (front post double chain) around next 2 dc, dc 2 , fpdc around next 2 dc, dc 12, join with a sl st
R3 Ch 2, dc 11, skip the next 4 sts, work fptrch (front post triple chain) around the next 2 sts,. Ch 2, Working behind the 2 previous stitches work 2 fptrch around the 2 skipped fpdc’s. Skip back to the other side of the cable twist, dc 12, join with a sl st
R4 Ch 2, dc 11, fpdc around next 2 sts, dc 2 in ch 2 space, fpdc around next 2 sts, dc 12, join with a sl st
R5 Ch 2, dc 11, fpdc around next 2 sts, dc 2, fpdc around next 2 sts, dc 12, join with a sl st
R6 Ch 2, dc 11, skip the next 4 sts, work fptrch around the next 2 sts,. Ch 2, Working behind the 2 previous stitches work 2 fptrch around the 2 skipped fpdc’s. Skip back to the other side of the cable twist, dc 12, join with a sl st
R7 Ch 2, dc 11, fpdc around next 2 sts, dc 2 in ch 2 space, fpdc around next 2 sts, dc 12, join with a sl st
R8 Ch 2, decrease next 2 sts together, dc 9, fpdc around next 2 sts, dc 2, fpdc around next 2 sts, dc 9, decrease next 2 sts together, dc in last dc, join with a sl st
R9 Ch 2, dc 10, skip the next 4 sts, work fptrch around the next 2 sts,. Ch 2, Working behind the 2 previous stitches work 2 fptrch around the 2 skipped fpdc’s. Skip back to the other side of the cable twist, dc 11, join with a sl st
R10 Ch 2, decrease next 2 sts together, dc 8, fpdc around next 2 sts, dc 2 in ch 2 space, fpdc around next 2 sts, dc 8, decrease next 2 sts together, dc in last dc, join with a sl st
R11 Ch 2, dc 9, fpdc around next 2 sts, dc 2, fpdc around next 2 sts, dc 10, join with a sl st
R12 Ch 2, dc 9, skip the next 4 sts, work fptrch around the next 2 sts,. Ch 2, Working behind the 2 previous stitches work 2 fptrch around the 2 skipped fpdc’s. Skip back to the other side of the cable twist, dc 10, join with a sl st
R13 Ch 2, dc 9, fpdc around next 2 sts, dc 2 in ch 2 space, fpdc around next 2 sts, dc 10, join with a sl st
R14 Ch 2, dc 9, fpdc around next 2 sts, dc 2, fpdc around next 2 sts, dc 10, join with a sl st
R15 Ch 2, dc 9, skip the next 4 sts, work fptrch around the next 2 sts,. Ch 2, Working behind the 2 previous stitches work 2 fptrch around the 2 skipped fpdc’s. Skip back to the other side of the cable twist, dc 4, (2dc in next st)twice, dc 4, join with a sl st
R16 Ch 2, dc 9, fpdc around next 2 sts, dc 2 in ch 2 space, fpdc around next 2 sts, dc 4, ch 4, dc 4, join with a sl st
R17 Ch 2, dc 9, fpdc around next 2 sts, dc 2, fpdc around next 2 sts, dc 4, dc 4 in ch 4 space, dc 4, join with a sl st
R18 Ch 2, dc 9, skip the next 4 sts, work fptrch around the next 2 sts,. Ch 2, Working behind the 2 previous stitches work 2 fptrch around the 2 skipped fpdc’s. Skip back to the other side of the cable twist, dc 4, (decrease next 2 sts together)twice, dc 4, join with a sl st
R19 Ch 2, dc 9, fpdc around next 2 sts, dc 2 in ch 2 space, fpdc around next 2 sts, dc 10, join with a sl st
R20 Ch1, work sc’s around, bind off and weave in ends.
Left Hand
Ch 30 join with a sl st being careful not to twist the chain
R1 Ch 2, dc in next ch and in each ch around , join with a sl st
R2 Ch 2, dc 11, fpdc (front post double crochet) around next 2 dc, dc 2 , fpdc around next 2 dc, dc 12, join with a sl st
R3 Ch 2, dc 11, skip the next 4 sts, work fptrch (front post triple chain) around the next 2 sts,. Ch 2, Working in front of the 2 previous stitches work 2 fptrch around the 2 skipped fpdc’s. Skip back to the other side of the cable twist, dc 12, join with a sl st
R4 Ch 2, dc 11, fpdc around next 2 sts, dc 2 in ch 2 space, fpdc around next 2 sts, dc 12, join with a sl st
R5 Ch 2, dc 11, fpdc around next 2 sts, dc 2, fpdc around next 2 sts, dc 12, join with a sl st
R6 Ch 2, dc 11, skip the next 4 sts, work fptrch around the next 2 sts,. Ch 2, Working in front of the 2 previous stitches work 2 fptrch around the 2 skipped fpdc’s. Skip back to the other side of the cable twist, dc 12, join with a sl st
R7 Ch 2, dc 11, fpdc around next 2 sts, dc 2 in ch 2 space, fpdc around next 2 sts, dc 12, join with a sl st
R8 Ch 2, decrease next 2 sts together, dc 9, fpdc around next 2 sts, dc 2, fpdc around next 2 sts, dc 9, decrease next 2 sts together, dc in last dc, join with a sl st
R9 Ch 2, dc 10, skip the next 4 sts, work fptrch around the next 2 sts,. Ch 2, Working in front of the 2 previous stitches work 2 fptrch around the 2 skipped fpdc’s. Skip back to the other side of the cable twist, dc 11, join with a sl st
R10 Ch 2, decrease next 2 sts together, dc 8, fpdc around next 2 sts, dc 2 in ch 2 space, fpdc around next 2 sts, dc 8, decrease next 2 sts together, dc in last dc, join with a sl st
R11 Ch 2, dc 9, fpdc around next 2 sts, dc 2, fpdc around next 2 sts, dc 10, join with a sl st
R12 Ch 2, dc 9, skip the next 4 sts, work fptrch around the next 2 sts,. Ch 2, Working in front of the 2 previous stitches work 2 fptrch around the 2 skipped fpdc’s. Skip back to the other side of the cable twist, dc 10, join with a sl st
R13 Ch 2, dc 9, fpdc around next 2 sts, dc 2 in ch 2 space, fpdc around next 2 sts, dc 10, join with a sl st
R14 Ch 2, dc 9, fpdc around next 2 sts, dc 2, fpdc around next 2 sts, dc 10, join with a sl st
R15 Ch 2, dc 3, (2dc in next st)twice, dc 4, skip the next 4 sts, work fptrch around the next 2 sts, Ch 2, Working in front of the 2 previous stitches work 2 fptrch around the 2 skipped fpdc’s. Skip back to the other side of the cable twist, dc 9, join with a sl st
R16 Ch 2, dc 3, ch 4, dc 4, fpdc around next 2 sts, dc 2 in ch 2 space, fpdc around next 2 sts, dc 9, join with a sl st
R17 Ch 2, dc 3, dc 4 in ch 4 space, dc 4,fpdc around next 2 sts, dc 2, fpdc around next 2 sts, dc 9, join with a sl st
R18 Ch 2, dc 9, skip the next 4 sts, work fptrch around the next 2 sts,. Ch 2, Working in front of the 2 previous stitches work 2 fptrch around the 2 skipped fpdc’s. Skip back to the other side of the cable twist, dc 4, (decrease next 2 sts together)twice, dc 4, join with a sl st
R19 Ch 2, dc 9, fpdc around next 2 sts, dc 2 in ch 2 space, fpdc around next 2 sts, dc 10, join with a sl st
R20 Ch1, work sc’s around, bind off and weave in ends.
some suggested supplies for this projest:
Subscribe to:
Posts (Atom)