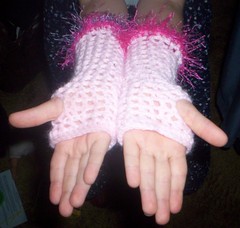
My 5yo dd Mady wanted a pair of the Groovy Gauntlets for herself (my little rockstar) I used the pattern below, sized down by using the tail end of a skein of soft pink 'baby' yarn and a size E crochet hook. I also added 2 rounds of sc at the cuffs using scraps of eyelash yarn. She is totally thrilled.
Pin It

. . . . . .Where all of the crafty chaos comes together!
Thursday, July 31, 2008
Wednesday, July 30, 2008
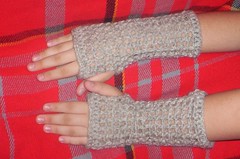
Groovy Gauntlets
These gauntlets crochet up really fast. The pictured example (with my 13yo dd as a hand model, were crocheted using Peace Fleece in Negotiation Gray
Hook: G
Yarn: Worsted Weight
Chain 30 and join in a loop, being careful not to twist.
R1 Ch2, dc in next ch, and in each ch around, join with a slip st in the second ch.
R2-R11 Ch3, sk1 *dc in next stitch, ch1* Repeat around and join with a sl st in second ch.
((LEFT HAND))
R12-13 Ch3, dc in same st (increase created), ch1, *dc in next dc, ch1* Repeat around and join with a sl st in second ch.
R14 Ch3, dc in next dc, ch1, dc in next dc, ch5, skip 2 dc's and dc in 3rd dc (thumb hole created), ch1, *dc in next dc, ch1* Repeat around and join with a sl st in second ch.
R15 Ch2, dc in next 2 dc's (decrease created), *ch1, dc in next dc *twice, ch1, dc in 2nd ch of chain space, ch1, sk1 ch, dc in next ch, ch1, dc in dc, ch1, *dc in next dc, ch1* Repeat around and join with a sl st in second ch.
R16 Ch3, skip next dc, dc in next dc, ch1, *dc in next dc, ch1* Repeat around and join with a sl st in second ch.
R17 Ch2, *dc in ch1 space, dc in next dc* Repeat around and join with a sl st in second ch.
R18 Slip stitch around and join, bind off, weave in ends.
((RIGHT HAND))
Work Rounds 1 through 11 the same as above.
R12 Ch3, *dc in next dc, ch1* 3 times, dc ch1 dc in next dc (increase created), ch1 **dc in next dc, ch1** Repeat around and join with a sl st in second ch.
R13 Ch3, *dc in next dc, ch1* 4 times, dc ch1 dc in next dc (increase created), ch1, **dc in next dc, ch1** Repeat around and join with a sl st in second ch.
R14 Ch3, dc in next dc, ch5, skip 2 dc and dc in 3rd, ch1, *dc in next dc, ch1* Repeat around and join with a sl st in second ch.
R15 Ch3, dc in next dc, ch1, dc in 2nd chain, ch1, skip 1 ch, dc in next ch, ch1, dc in next 3 dc (decrease created), ch1, dc in next dc, ch1, Repeat around and join with a sl st in second ch.
R16 Ch3 *dc in next dc, ch1* 3 times, skip next dc, dc in next dc, ch1, **dc in next dc, ch1** Repeat around and join with a sl st in second ch.
R17 Ch2, *dc in ch1 space, dc in next dc* Repeat around and join with a sl st in second ch.
R18 Slip stitch around and join, bind off, weave in ends
© 2008-by Amy O’Holleran: This is my original work, and may not be reproduced for sale without my express permission. Pin It
Saturday, July 26, 2008
BumGenius giveaway
There is a contest to win 12 BumGenius dipes here (BabyCheapskate) Go sign up!
The contest will run through Wednesday, August 6 at midnight, EDT or until there are5000 entries.. Winner will be decided via random drawing and contacted via the email address provided. Open to U.S. residents only. Pin It
The contest will run through Wednesday, August 6 at midnight, EDT or until there are5000 entries.. Winner will be decided via random drawing and contacted via the email address provided. Open to U.S. residents only. Pin It
Wednesday, July 16, 2008
'No Sweat' Water bottle cozies
With a concern for the number of single use water bottles my kids could go through in a given week (recycleable, yes, but sooo wasteful) I've given them all reusable water bottles. In an effort to combat the sweating that happens with any cold beverage, I have worked them up some 'No Sweat" cozies. These are so simple to do.
All were made with different novelty yarns (ribbon, funfur, component yarn)
The first 2 on the left were made by crocheting on size I hook
4chains into a loop, working 2 chains, then working 12 dc's and joining with a slst to form a ring.
Slip stitch to the space between the first 2 dc's, chain 2 and dc in the same space, 2 dc in next space, and around, joining with a slip st.
Slip st to the space between the first 2 dc's, ch3, and dc in the next space, **ch1, dc in next space**, around. join w/ slip st.
Slip the first space between the first 2 dc's, ch3, and dc in the next space, **ch1, dc in next space**, around. join w/ slip st.
Continue in this fashion until the cozy is tall enough to reach the neck of your bottle...it will stretch a bit, so check frequently for size.
Bind off and run a drawstring in and out of the last row of dc's.
The 3rd cozy is also crochet, also on size I, and for the first 2 rounds, is worked the same as above, but instead of continuing in dc's all the way up, ch 5 and sc into the dc spaces, working a couple of slip stitches at the end of each round so that you are starting the next round around the 3rd chain of each ch5 set.. To finish, work a round of **sc, ch1* around the top, then a round of **dc, ch1** ,bind off, weave a drawstring through the final dc row.
The fourth design was worked up on the small blue Knifty Knitter with a boucle yarn. It was a bit of a "collaboration" with my 9yo dd (ie, she did some, mom did most, LOL) She has a thermos style bottle, but still wanted a cozy. We worked about 15 rounds, worked a crochet bind off, adding in a large coordinating hairtie elastic, basically just encasing the elastic within the sc bindoff, cinched the bottom closed and secured it firmly. It just slips over the bottle like a sock, and is held up really will by the elastic, much better for this type of bottle,as it won't slip off too easily.
Pin It
Thursday, July 10, 2008
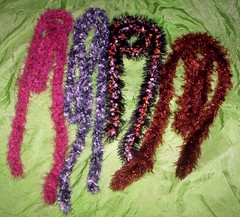
The "Totally Mindless" Fashion scarf
Sometimes I really don't want to have to pay attention to what I am doing while watching tv or a movie. At those times, I will pull out a ball of fun fuzzy yarn and do some finger knitting. (Usually scored from the $tree or 99cent stores...can't beat those prices!) I learned (a lifetime ago) at summer camp ((Picture a tent garlanded with miles of gaudy yarn tubes, LOL)). For this technique (if you don't know how to finger knit, check out http://www.knitty.com/issuesummer06/FEATfingerknitting.html ) I don't use all 4 fingers like you normally would, but just 2. I "knit" the entire ball into a long (and much thicker) strand, then "knit" the resulting strand, again using just 2 fingers. I weave in the tails that are left from the first "knit-through", and voila!! I much prefer this technique over simply doing a 4-finger finger knit, as the resulting 'fabric' will be a bit denser, with less stretch than the traditional finger knitting. You really do not want too much stretch on long scarves like these. Since all balls of yarn are not created equal, there will some variation from scarf to scarf. The ones pictures here are from left to right...Bernat Bling Bling in "Moulin Rouge", Bernat Bling Bling in "Night Club", Lion Brand Fancy Fur in "Tiger Eye", and Lion Brand Festive Fur, in a colorway I can't locate, LOL. They make super quick and easy last minute gifts. My eldest dd likes to make these for her friends on their birthdays.
Pin It
Pin It
Subscribe to:
Posts (Atom)